Workflow (Automation)
Build automations that create tasks, run AI reviews, notify your team, and push work into your other tools — on a schedule or the moment something happens.
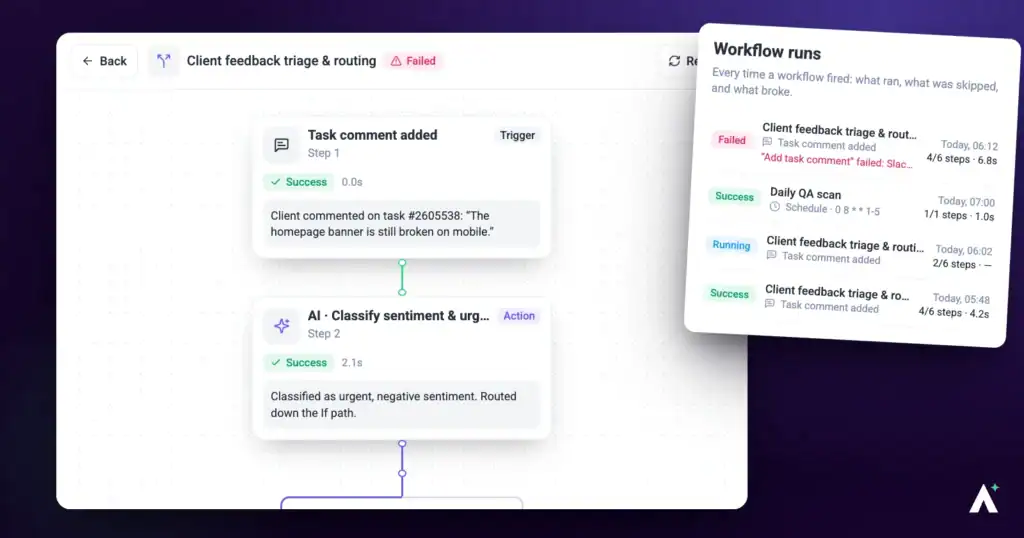
A workflow is a saved automation: a trigger, plus one or more steps that follow it. The trigger decides when it runs — on a schedule, or in response to something happening in your workspace. The steps decide what happens next.
They handle the work that is easy to describe and easy to forget: raise a task every time a client comments, run an AI review on a page every month, push new tasks into Slack, or send a report at the end of each week.
Who this is for
Workflows sits in the left navigation and is permission-gated. If your role does not carry workflow access, the item will not appear. Creating a workflow needs a separate create permission, so it is possible to see existing workflows without being able to add new ones.
The words Atarim uses
Workflows has its own vocabulary, and the interface is consistent about it. Knowing these five terms makes everything else easier to follow.
| Term | What it means |
|---|---|
| Workflow | A saved automation — a trigger plus one or more steps. |
| Template | A pre-built workflow. Use creates your own copy to edit; Subscribe keeps Atarim’s version and its updates. |
| Trigger, Action, Condition, Step | The building blocks. A trigger starts a workflow, and the actions after it are its steps. A condition is a check you choose inside an If/Else step, which sends the workflow down one of two branches. |
| Time (cadence) | How often a workflow runs, in plain language: On demand, Daily, Weekly, Monthly, Quarterly, or Yearly. On demand means it is event-triggered with no schedule. |
| Run | A single execution, recorded with a status, timing, and a step-by-step trace. |
Finding your way around
Select Workflows in the left navigation. The screen has three tabs.
| Tab | What it covers |
|---|---|
| Templates | Ready-made workflows you can copy or subscribe to in a couple of clicks. Each shows its estimated credit cost per run. |
| Manage | Headed Your Workflows — everything you have created, with controls to edit, activate, attach projects, and delete. |
| Runs | Every execution of every workflow, with status, timing, and a link into the detailed trace. |
If you have not built anything yet, the Manage tab shows No Workflows Yet with a Create Your First Workflow button.
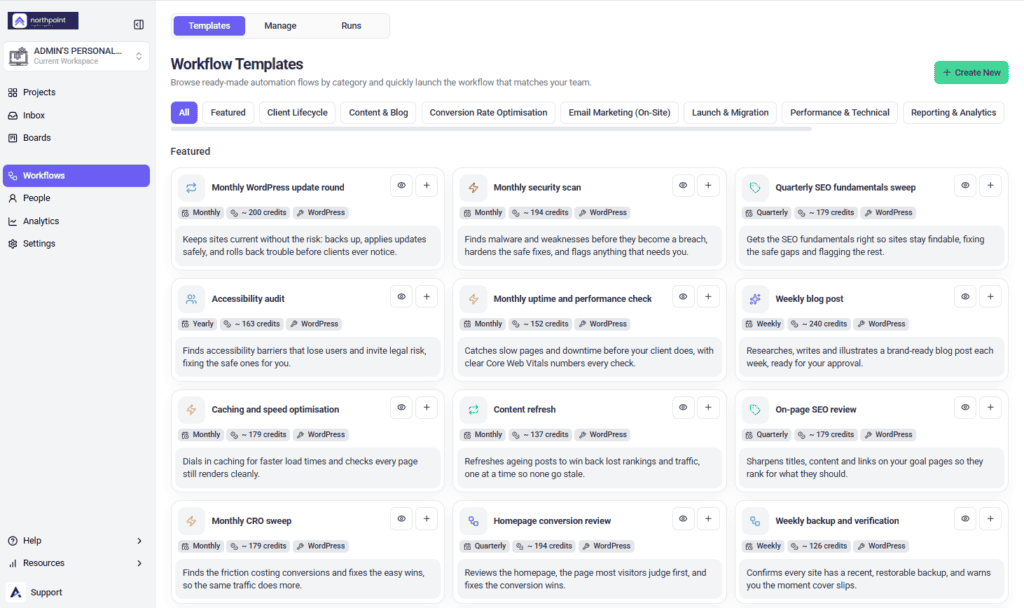
Using a template
Templates are complete, working workflows. Use creates your own copy, which you then own and can change freely. Subscribe follows Atarim’s version instead, as explained in Use or subscribe below. The steps here are for Use.
Instructions:
- Open Workflows and stay on the Templates tab. Template cards load, each showing a name, a short description, its estimated credit cost per run, and the technologies it applies to.
- Select the preview action on a card to see what it actually does before committing. A preview opens showing the workflow laid out on a canvas — its trigger and every step — read-only.
- Check the estimated cost against how often you intend to run it. Cost is per run, so a template at a daily cadence costs roughly thirty times its monthly equivalent.
- Select Use to make your own copy. In an agency workspace this opens the workflow in the canvas, pre-filled and ready to adjust — nothing exists until you save it. In a client workspace (Beta) the workflow is created straight away and you land on Manage. Either way the template itself is unchanged, and your copy is independent of it.
- Choose the projects it should run against, then switch it on. In the builder, use the project selector, select Save, then Launch. On Manage, use the row’s project selector and play button. Until both are done, it will not run.
Narrowing down the list
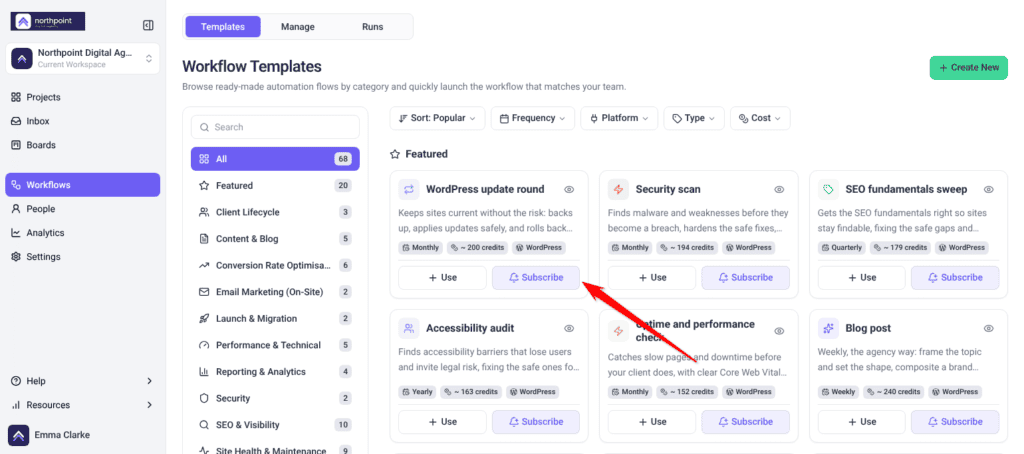
The library is large, so the Templates tab gives you several ways to cut it down before you start previewing.
| Control | What it does |
|---|---|
| Category list | Down the left, starting with All and then one entry per template category, each with a count. Select a category to see only its templates, or All to bring everything back. On narrow screens only the search box shows. |
| Search | Matches on the template’s name and its description. |
| Sort | Popular, Name, Cost: Low to High or Cost: High to Low. |
| Frequency | How often a scheduled template runs — daily, weekly, monthly, quarterly or yearly. Only the cadences present in the library are offered. |
| Platform | Narrows to templates that need a particular platform. WordPress is the only one at the moment. |
| Type | Scheduled for templates that run to a cadence, Event-based for ones that fire when something happens — a tag added, a comment left, an alert email arriving. |
| Cost | Caps the estimated credits per run: under 100, under 200 or under 500. |
Use or subscribe
Every template card has two buttons, Use and Subscribe. The preview asks the same question: How do you want to add it?
| Button | What you get |
|---|---|
| Use | Your own copy (Make my own copy in the preview). You can edit every step, and it does not change when Atarim improves the template. |
| Subscribe | Atarim’s version, kept up to date. Atarim maintains the steps, so you cannot edit them. You choose the projects it runs on and adjust the trigger settings, then select Save or Launch. The template card then shows Subscribed. |
To change a subscribed workflow’s steps yourself, select Unsubscribe from template, either in its row on the Manage tab or in the panel when you open it. It keeps its steps and becomes yours to edit, but it stops receiving updates and cannot be linked to the template again.
Building a workflow from scratch
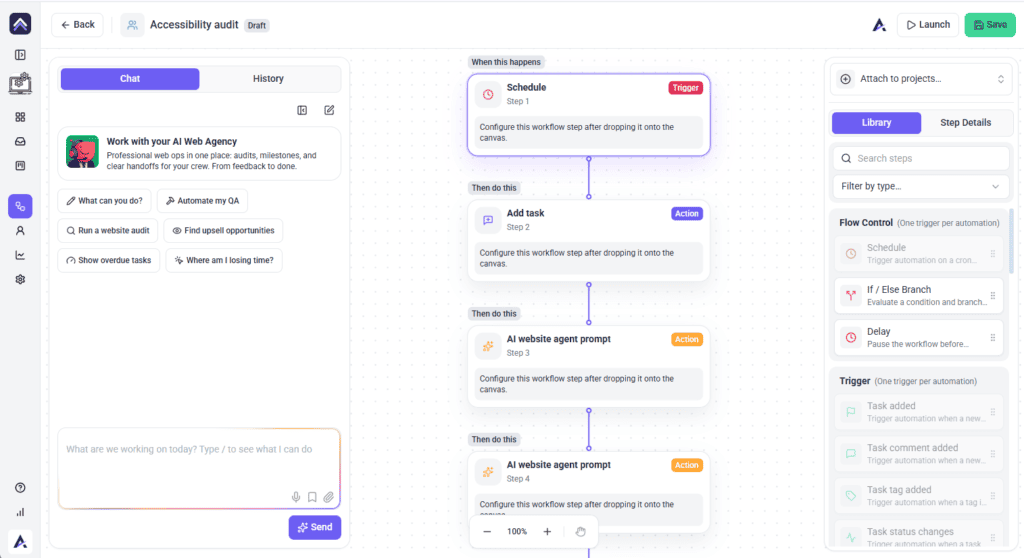
Select Create New on the Manage tab to open the canvas. Your workflow sits in the middle, and everything you build it with is in the panel on the right: a project selector at the top, then a two-tab split between Library and Step Details.
Step 1 — Add your trigger
Every workflow has exactly one trigger, and it decides when everything below it runs.
Instructions:
- Select Create New. The canvas opens with an empty starting point and the step library in the panel on the right.
- Find your trigger in the library. Use the Search steps box at the top if the list is long. The library is grouped, in this order: Flow Control, Trigger, AI Action, Action and Integrations. You can also filter to just the group you need. The Schedule trigger, Delay and If/Else all sit under Flow Control. Steps that add tasks to another tool only appear once that integration is switched on.
- Add the trigger to the canvas. It becomes the first node. Every workflow has exactly one.
- Select the trigger node to open its settings, and fill in any fields it needs. A Schedule trigger asks for a cadence; most task triggers need nothing.
Step 2 — Add your steps
Steps run top to bottom in the order you place them, so the sequence on the canvas is the sequence at runtime.
Instructions:
- Add an action from the library. It joins the canvas beneath the trigger. Steps run in order, top to bottom.
- Select the node to open its configuration panel. The panel shows only the fields that step needs.
- Fill in the required fields. Many fields load live options from your workspace. If a dropdown is empty, set the project field first, or check the relevant integration is connected.
- Repeat for each step in your sequence. To remove a step, select it and use the delete control in its panel.
To run steps only when something is true, add an If/Else step from Flow Control and choose its Condition in Step Details. Steps under If run when the condition is met, and steps under Else run when it is not. Each branch needs at least one step before the workflow can be saved.
Step 3 — Set the task context where it matters
This is the part people miss. When an action step follows other steps, its panel gains a Task context field, which decides which task that step acts on.
| Task context | The step acts on |
|---|---|
| Trigger task | The task that started the workflow. This is the default and what you want most of the time. |
| A previous step | Something an earlier step created or acted on — for example a task created by an Add task step further up. |
Step 4 — Name, save, attach, activate
A workflow does nothing until it is both attached to a project and switched on — saving alone is not enough.
Instructions:
- Give the workflow a name that describes what it does. Client comment to task and Slack beats Workflow 3 once you have a dozen.
- Choose the projects it should run against in the selector at the top of the right-hand panel.
- Select Save. A new workflow is saved as a draft.
- Select Launch to switch it on. Without a project it refuses with “Attach a project to this workflow before launching it.” Once the workflow is live the button reads Active; select it again to pause. You can also use the play button in the Actions column of the Manage tab.
- Trigger it once deliberately and check the Runs tab. Confirm every step reads Executed before relying on it.
Removing the last project from an active workflow pauses it when you save, with the message Workflow saved and paused because it has no projects. The exception to both rules is Incoming Email. It listens to your workspace inbox, so it needs no project, and you can launch it from the builder without one.
Using chat while you build
The builder has a chat panel on the left of the canvas. It is the same Claro you can talk to elsewhere in Atarim, and it doesn’t see which workflow is open, so name the workflow or step you mean. Ask how a trigger or step works, or describe an automation in your own words and ask Claro to create it.
Instructions:
- Open a workflow, or select Create New on the Manage tab.
- Type your question or request in the chat panel and send it. Type / to see suggestions.
- Select New chat (the pen icon) to start a fresh conversation.
- Select the History tab to go back to an earlier conversation.
- Select Collapse chat to give the canvas more room, and Open chat (the speech bubble at the top left of the canvas) to bring it back.
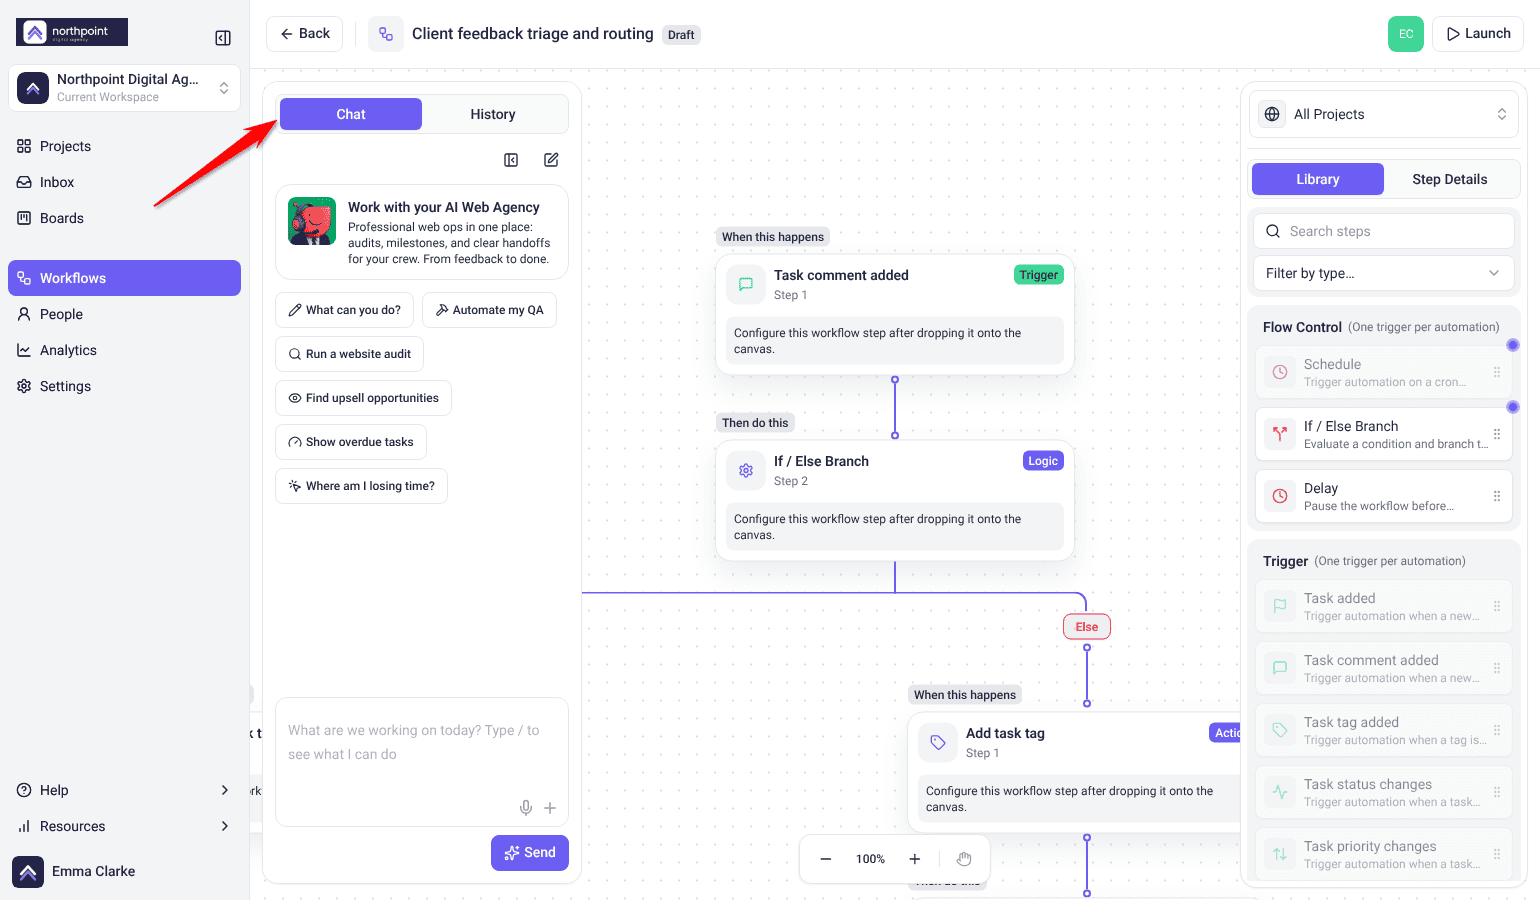
The chat panel shows on wider screens only. Each reply uses credits, and you need at least 10 credits available for a reply to start. Explore Credits & Usage
Using placeholders in your steps
Placeholders insert live task data into text as the workflow runs. They are written between double percent signs — %%task_title%% — and are replaced with real values at run time.
They are not accepted everywhere. Only two fields process them:
| Step | Field | Placeholders |
|---|---|---|
| Send HTTP request | Payload | Supported |
| Notify person(s) | Message | Supported |
| Notify person(s) | Title | Not supported — a placeholder here is sent as literal text. |
| Add task comment | Comment | Not supported |
| All other steps | — | Not supported |
%%task_title%% arrives as those literal characters. Put the dynamic detail in the Message instead and keep the title fixed.
A worked notification
Title (fixed text): New client feedback
%%comment_author%% commented on %%task_title%%: "%%comment_message%%" — see %%task_page_url%%The recipient gets an email with the subject “New client feedback”, and the author, task, comment text and link filled in.
Trigger reference
Every workflow needs exactly one trigger, and none of them add to the cost of a run. Twelve are available.
| Trigger | Fires when | Shown on the canvas as |
|---|---|---|
| Schedule | A cadence you define runs — daily, weekly, monthly, quarterly, or yearly. A monthly schedule set for the 29th, 30th or 31st runs on the last day of shorter months rather than skipping them. | On schedule |
| Task added | A new task is created. | When task added |
| Task comment added | A new comment is left on a task. | When task comment added |
| Task tag added | A tag is added to a task. | When task tag added |
| Task status changes | A task’s status changes. | When task status changes |
| Task priority changes | A task’s priority changes. | When task priority changes |
| Task completed | A task is completed. | When task is completed |
| Incoming Email | An email arrives in your connected inbox. | When an email is arrived |
| Graphic Added | A new image is created. | When graphic is added |
| Workflow Started | Another workflow starts. | When workflow starts |
| Workflow Completed | Another workflow completes. | When workflow completes |
| Workflow Failed | Another workflow fails. | When workflow fails |
Condition reference
Conditions are the checks an If/Else step can make, chosen in its Condition field as described in Step 2 above. Six are available, and none add to the cost of a run.
| Condition | Checks |
|---|---|
| Task status is set to | The task is at a particular status. |
| Task priority is set to | The task is at a particular priority. |
| Assigned user | The task is assigned to a particular person. |
| Task tag is set to | The task carries a particular tag. |
| Page status is set to | The page is at a particular status. |
| Email field contains | An incoming email field contains specific text — useful for routing by sender or subject. |
Task actions
The everyday building blocks. None of these add to the cost of a run.
| Step | What it does | Fields you set |
|---|---|---|
| Add task | Creates a task. | Project, and the task Comment (required). |
| Add task comment | Adds a comment to the task. | Comment (required). |
| Change task status | Moves the task to a different status. | Status (required). |
| Change task priority | Changes the task’s priority. | Priority (required). |
| Change task assignee | Reassigns the task. | Assignees — multi-select, required. |
| Add task tag | Applies one or more tags. | Tags — multi-select, required. |
| Remove task tag | Removes one or more tags. | Tags — multi-select, required. |
| Complete task | Marks the task done. | No configuration. |
| End Task Timer | Stops a running timer on the task. | No configuration. |
Flow control: Delay
Delay pauses the workflow before it continues to the next step. It adds nothing to the cost of a run, and it is what turns a simple automation into a follow-up system.
Instructions:
- Add a Delay step at the point where the workflow should wait. Everything above it runs immediately; everything below waits.
- Enter the wait using the five fields: Delay (weeks), Delay (days), Delay (hours), Delay (minutes), and Delay (seconds). Fill in only the units you need and leave the rest blank. They add together, so 1 day plus 12 hours waits 36 hours.
- Add the steps that should run after the wait.
Practical uses for a delay
Three patterns that use a delay well:
- Chase a stale task. Trigger on a status change, wait three days, then add a comment asking for an update.
- Nudge a client. Trigger when a review tag is added, wait two days, then post a gentle follow-up.
- Follow up internally. Trigger when a task is added, wait five days, then notify the person handling it.
AI actions
These are the only steps that add credits on top of the 10-credit base cost of each run. Costs shown are per step, per run.
| Step | Cost | What it does | Fields you set |
|---|---|---|---|
| AI design review | 10 | Runs a headless AI design review across a project or a single page. The review is charged like one you start yourself, at 10 credits for each screen-height section of the page, so 10 is the least it costs. | Project and Review intent (both required), optional Page and Review prompt, and Output mode — a batch of tasks, a summary report, or both. |
| AI project brief | 5 | Runs brand kit discovery to generate or update the project brief. | Project (required) and Mode — overwrite the existing brief or append to it. |
| AI website agent prompt | 5 | Runs a website or task AI agent against your own prompt. | Prompt (required), Output destination — a new task, a comment, or a report — and an optional Project. |
| Create AI image | 5 | Generates an image from a prompt. | Prompt (required), Dimensions — square, landscape, or portrait — Output — store as an asset or attach to the task — and an optional Project. |
| Do It (AI execution) | 5 | Finds and completes pending Do It actions on tasks in scope. | Task scope — the current task, all tasks in the project, or filtered tasks — On completion — mark complete or mark pending review — plus an optional confidence threshold and Project. |
What runs on its own, and what waits for you
An AI step can change a real site. Whether that change is held for a human first depends on how the step was started, and the difference is not obvious from the builder.
| Where the AI step runs | What happens to a site-changing action |
|---|---|
| In chat, on a page, or in a task | Held. Installing or activating a plugin, and any WordPress action the site itself reports as destructive, come back as a request in the project’s Approval Queue rather than running. Nothing reaches the site until you approve it. |
| In an active workflow, on a schedule | Runs. Switching the workflow on is treated as the sign-off, and there is nobody watching a queue overnight to answer a prompt. |
Two things a scheduled workflow will not do:
- Run a PHP snippet. That is refused inside a workflow and stays on interactive surfaces only, where a person can see what it would do before it runs.
- Quietly skip a plugin it needs. If a step depends on a plugin from The Stack and that plugin is not installed, the install queues for approval even on a scheduled run.
Where approvals appear
Open the project and look for Your Approval Is Needed on its dashboard, beside Credits. Each pending item expands to show what the AI wants to run, and you approve or decline it there. Approve all works through several in order. A request nobody decides on within 14 days is declined automatically, and nothing runs. Once every request a conversation raised has a decision, the AI picks that conversation back up with the outcome. In workspace chat (Beta) the same requests are also under Approvals at the top of the chat. Explore Approving from chat
Project, page, and image actions
| Step | What it does | Fields you set |
|---|---|---|
| Create New Site | Creates a project from a URL. Respects your workspace project limit. | URL (required) and an optional Title. |
| Add page | Adds a page to a project. | Project (required), and a Page URL source — entered manually or taken from an earlier step — plus an optional Page name. |
| Update Page Status | Changes a page’s status. | Page status. |
| Create Graphic Site | Creates an image project from an uploaded file, converting it where needed. | Optional Original filename and Graphic title. |
| Add graphic image | Adds an image to an existing image project. | Graphic project and Image source (required) — upload a file or use the output of a previous step. |
| Add graphic image version | Adds a new version of an existing image. | Graphic (required). |
Notification and email actions
| Step | What it does | Fields you set |
|---|---|---|
| Notify person(s) | Emails the people you choose. The Title becomes the subject line. | Recipients, Title, and Message — all required. |
| Send notification to Slack | Posts to your connected Slack workspace. | Notification type (required). |
| Forward Email | Forwards an incoming email onward. | Forwarding emails (required). |
| Respond to Email | Replies automatically to an incoming email. | Message (required) and an optional Subject. |
Integration actions
Each of these pushes an Atarim task into an external tool. None add to the cost of a run, but all require that integration to be connected first under Settings → Connected Apps → Integrations. The fields differ because each tool organises work differently.
| Step | Fields you set |
|---|---|
| Add Task to Asana | Project and Section — both required. |
| Add Task to Basecamp | Project, To-do set, and To-do list — all required. |
| Add Task to Clickup | Folder and Task list — both required. |
| Add Task to Jira | Project — required. |
| Add Task to Monday | Board (required) and an optional Group. |
| Add Task to Teamwork | Project and Task list — both required. |
| Add Task to Trello | Board and List — both required. |
Output actions
| Step | Cost | What it does | Fields you set |
|---|---|---|---|
| Send HTTP request | 0 | Sends data to any external service that accepts a webhook. | URL and HTTP method (required), plus optional Headers and Payload. Covered in full below. |
| Create Workflow PDF Report | 1 | Exports a PDF summary of the run, covering its steps, timing, and outputs. | No configuration. |
Example workflows
Seven patterns built from the triggers and steps above. Each names the trigger, the steps in order, and what problem it solves. Where an example checks a condition, it uses an If/Else step: the steps after it go in the If branch, and the Else branch needs at least one step of its own.
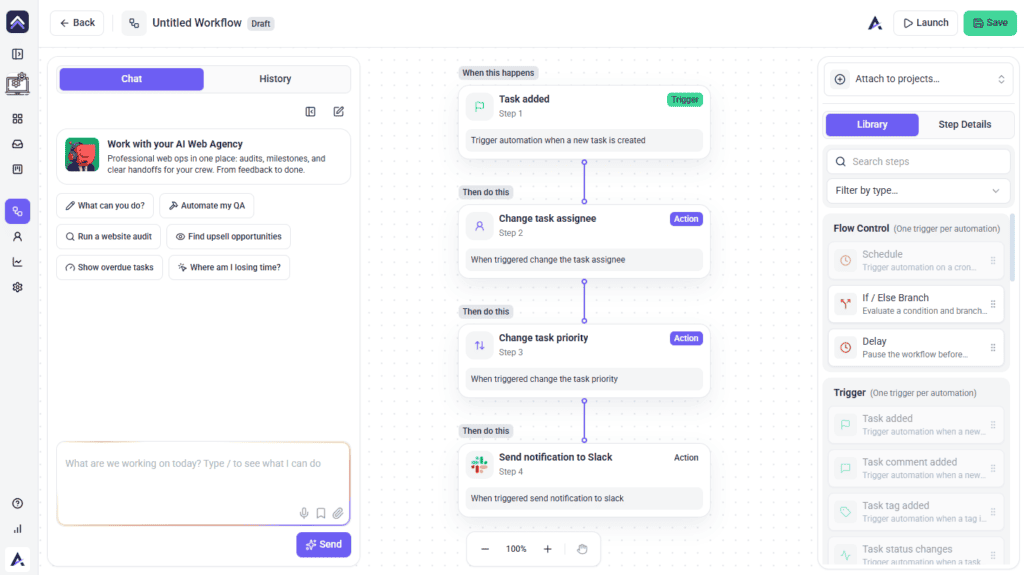
1. Turn client feedback into assigned work
The problem: comments arrive on a project and nobody notices until someone opens the dashboard.
Build it like this:
- Trigger: Task comment added.
- Change task assignee — route it to whoever owns that client.
- Change task priority — set it so it surfaces in their queue.
- Send notification to Slack — tell the team where they already are.
Feedback becomes assigned work the moment it is left, for the 10-credit base cost of a run and nothing more.
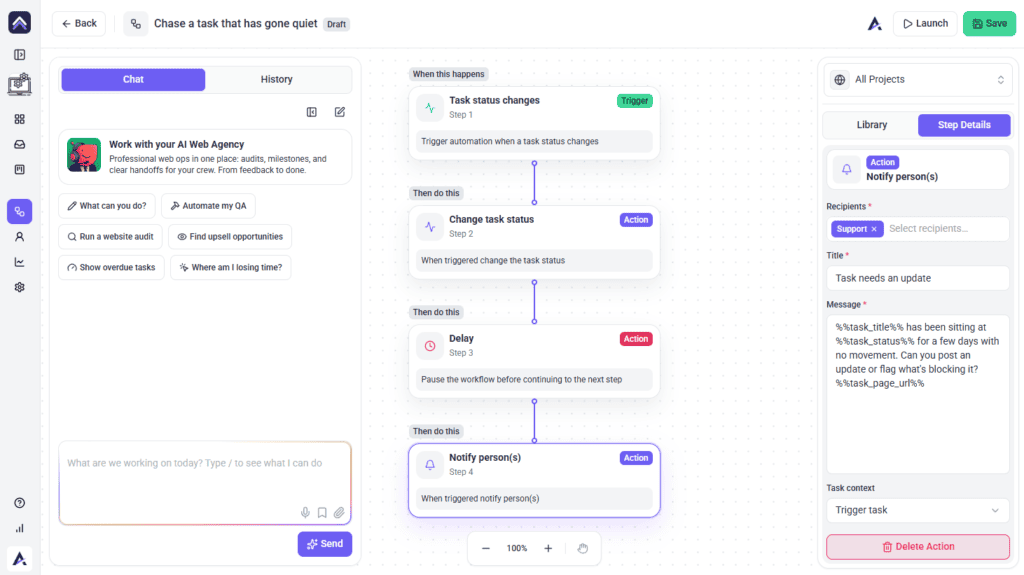
2. Chase a task that has gone quiet
The problem: work moves to In Progress and then sits there.
Build it like this:
- Trigger: Task status changes.
- If/Else: Task status is set to your in-progress status.
- Delay — three days.
- Add task comment — ask for an update.
- Notify person(s) — tell the assignee.
Stale work chases itself instead of waiting for a status meeting.
3. Nudge a client who has not replied
The problem: work is blocked waiting on client approval and nobody wants to keep asking.
Build it like this:
- Trigger: Task tag added.
- If/Else: Task tag is set to your review tag.
- Delay — two days.
- Add task comment — a short, friendly check-in.
The follow-up happens on time and reads as considerate rather than nagging.
4. Monthly site review with a client-ready report
The problem: retainer clients expect proactive work, and nobody has time to audit every site by hand.
Build it like this:
- Trigger: Schedule — monthly.
- AI design review — set Output mode to a batch of tasks, or to both if you want a summary too. (10 credits per section reviewed)
- Create Workflow PDF Report — a summary you can send on. (1 credit)
Each monthly run costs the 10-credit base, 10 credits for each section the review covers and 1 for the report, and the report writes itself.
5. Route incoming client emails
The problem: requests arrive by email and get lost between inboxes.
Build it like this:
- Trigger: Incoming Email, with From email contains set to the client’s domain or Subject contains set to a keyword.
- Add task — create the work on the right project.
- Respond to Email — acknowledge receipt automatically.
The client gets an immediate reply, and the request lands as a task rather than sitting in someone’s inbox.
6. Push urgent work into your dev tool
The problem: developers work in Jira and never see Atarim.
Build it like this:
- Trigger: Task priority changes.
- If/Else: Task priority is set to your highest level.
- Add Task to Jira — choose the project.
- Notify person(s) — alert the lead.
Only genuinely urgent work crosses over, so the dev board does not fill with noise.
7. Know when your automations break
The problem: a workflow fails quietly and nobody notices for weeks.
Build it like this:
- Trigger: Workflow Failed.
- Notify person(s) — tell whoever maintains your automations.
- Send notification to Slack — optional, for visibility.
One cheap workflow that watches all the others. Build this first.
Managing your workflows
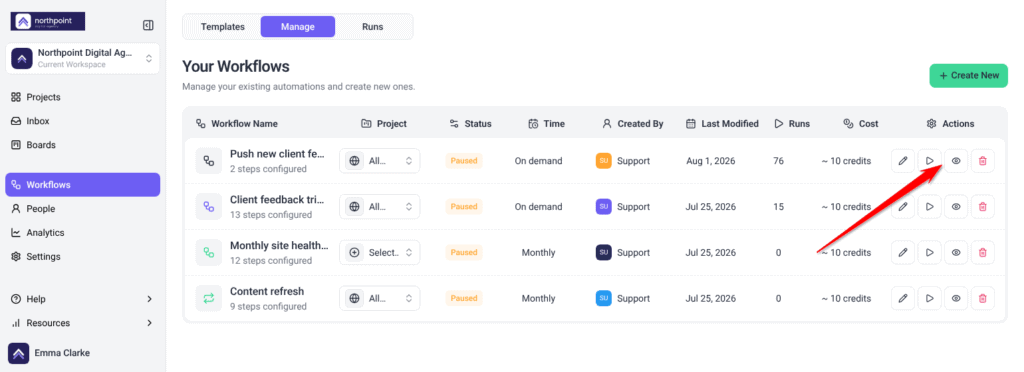
The Manage tab lists everything you have built:
| Column | What it shows |
|---|---|
| Workflow Name | The name you gave it, with any tags beside it: Internal, a padlock for a subscribed workflow, and a health badge when something needs attention. |
| Project | Which projects it is attached to. A workflow with none attached cannot be activated. |
| Status | A read-only badge reading Draft, Active or Paused. You cannot change it from here. |
| Time | Its cadence — On demand, Daily, Weekly, Monthly, Quarterly, or Yearly. |
| Created By | Who built it. |
| Last Modified | A date for each workflow. Selecting this heading sorts the list newest or oldest first. |
| Runs | How many times it has run successfully. Failed runs are not counted here. |
| Cost | Estimated credits per run. |
| Actions | Edit, activate or pause, hide from or show to the client, and delete. The activate control is a play or pause icon depending on the current state. A subscribed workflow also has Unsubscribe from template, and its edit control reads Choose projects. In a client workspace (Beta) you can only activate, pause, hide or delete workflows you created. |
Attaching projects
A workflow only runs against the projects attached to it, so an unattached one stays inert however well it is configured.
Instructions:
- Find the workflow’s row and open the Project column’s selector, labelled Select… when nothing is attached. A list of your projects opens, each with a checkbox. Choose All Projects to cover every project, including ones added later.
- Select every project this workflow should run against.
- Close the selector. Your choices are saved when the selector closes, and the column updates to show what is attached.
If you manage clients in Atarim (Beta), each client is linked to one of your workspaces, normally your default one. Workflows in that workspace also cover the client’s projects. All Projects includes them, and a workflow attached to a client’s project runs there when its trigger fires, for example when a task is added on that project.
Activating and pausing
Pausing is the safe way to stop a workflow: it halts future runs and keeps the history of past ones.
Instructions:
- Select the play button in the Actions column to switch a workflow on. Its tooltip reads Activate workflow. The Status column is only a badge — there is nothing to click there.
- If no project is attached, activation refuses and a message appears: “Attach a project to this workflow before activating it.” Attach one and try again.
- On an active workflow the same button becomes a pause icon, tooltipped Pause workflow. Pausing stops future runs. Past runs and their traces are kept.
Hiding a workflow from the client
In a client workspace (Beta) you can keep a workflow off the client’s list of workflows. Select the eye button in its row, Hide this workflow from the client. The workflow is tagged Internal and drops off the client’s list. It still runs, and anything it creates stays visible to them. Select the button again, Show this workflow to the client, to put it back.
Editing and deleting
Editing reopens the canvas and needs its own permission. Deleting is permanent, and names the workflow back to you first.
Instructions:
- Select the edit action on a row to reopen the workflow on the canvas. Editing requires its own permission, so the control is hidden if your role lacks it.
- Select the delete action to remove a workflow. A confirmation dialog opens, headed Delete Workflow, naming the workflow and warning that the action cannot be undone.
Checking what actually happened
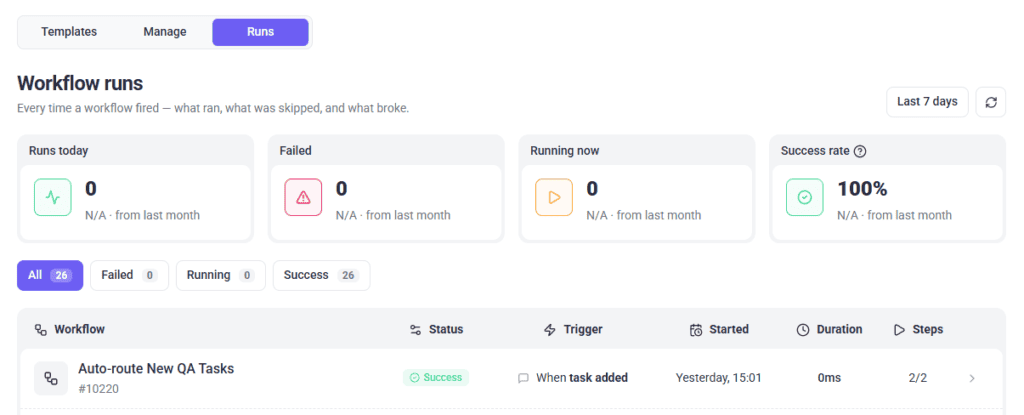
The Runs tab lists every execution, successful or not.
- Open the Runs tab. Every run across all your workflows is listed, newest first.
- Filter by outcome using the All, Failed, Running, and Success chips. Each chip shows a count, so you can see at a glance how many runs failed.
- Narrow the period with Last 7 days, Last 30 days, Last 90 days, or All time.
- Select a run to open its trace.
| Column | What it shows |
|---|---|
| Workflow | Which workflow ran. |
| Status | The outcome of the run as a whole. |
| Trigger | A plain-language summary of what fired it, such as When task comment added. A run started from a chat, by an AI assistant or with Re-run shows Run manually. |
| Started | When it began. |
| Duration | How long it took. |
| Steps | How many steps it worked through. |
Reading the statuses
Runs and steps use different words, deliberately.
| Level | Possible statuses |
|---|---|
| The run as a whole | Pending, Running, Success, Failed, or Skipped. |
| An individual step | Executed, Skipped, Failed, or Retrying. |
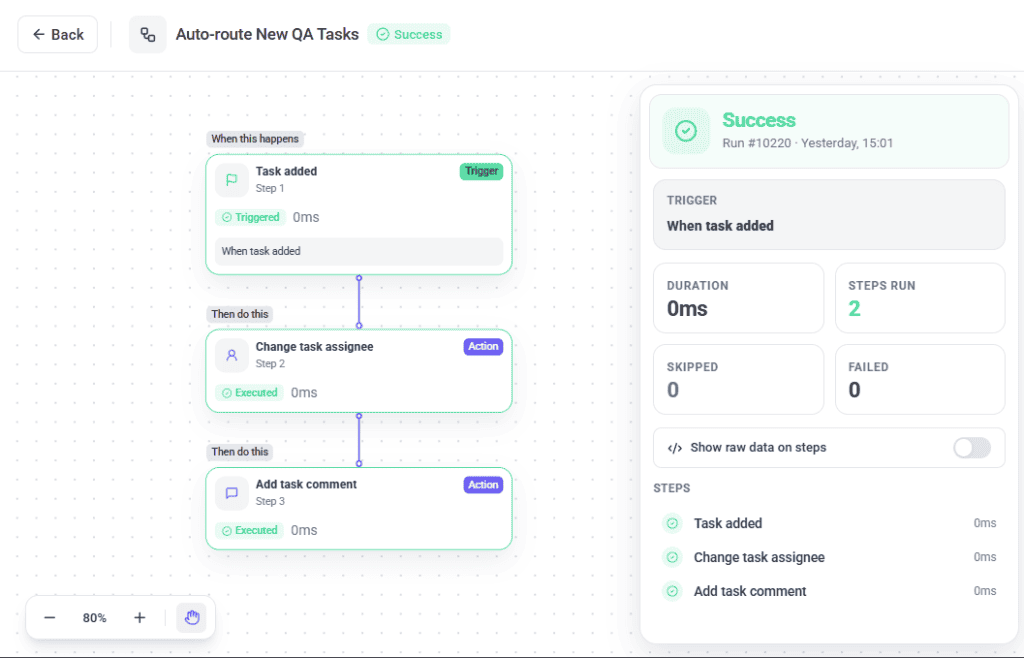
Reading a run trace
Opening a run shows the workflow drawn out with each step’s status on it, alongside a summary panel. The panel gives you:
Instructions:
- The run status in large type, with the run number and when it started.
- Duration — how long the whole run took.
- Steps run, Skipped, and Failed counts.
- The trigger summary describing what set it off.
- For a failed run, a Failed at step message with the error text.
Running a workflow again
A scheduled workflow can be run again from one of its runs, for example once you have fixed the step that failed.
Instructions:
- Open the Runs tab and select the run.
- Select Re-run, at the top of the trace or at the bottom of its panel. “Workflow re-run queued.” confirms it.
- Find the new run at the top of the Runs list.
Re-run only appears on runs of scheduled workflows. A workflow that fires when something happens runs again the next time that happens. You can also ask Claro in a chat, or your AI assistant, to run a workflow now. A re-run costs credits like any other run.
How to set up a custom webhook
The Send HTTP request step sends data from Atarim to any external service that accepts a webhook — Make, Zapier, n8n, a serverless function, or your own endpoint. It is the escape hatch for anything the built-in integrations do not cover, and it adds nothing to the cost of a run.
The four fields
| Field | What to enter |
|---|---|
| URL (required) | The endpoint you are sending to, copied from the receiving service. |
| HTTP method (required) | GET, POST, PUT, PATCH, or DELETE. Most webhooks expect POST. |
| Headers | Optional. JSON, or one header per line. Use this for an authorisation token. |
| Payload | Optional. The body to send, as JSON. Not sent on GET or DELETE. |
Step 1 — Get a test URL first
Before pointing a workflow at your real endpoint, send it somewhere you can inspect. This takes two minutes and saves a great deal of guesswork.
Instructions:
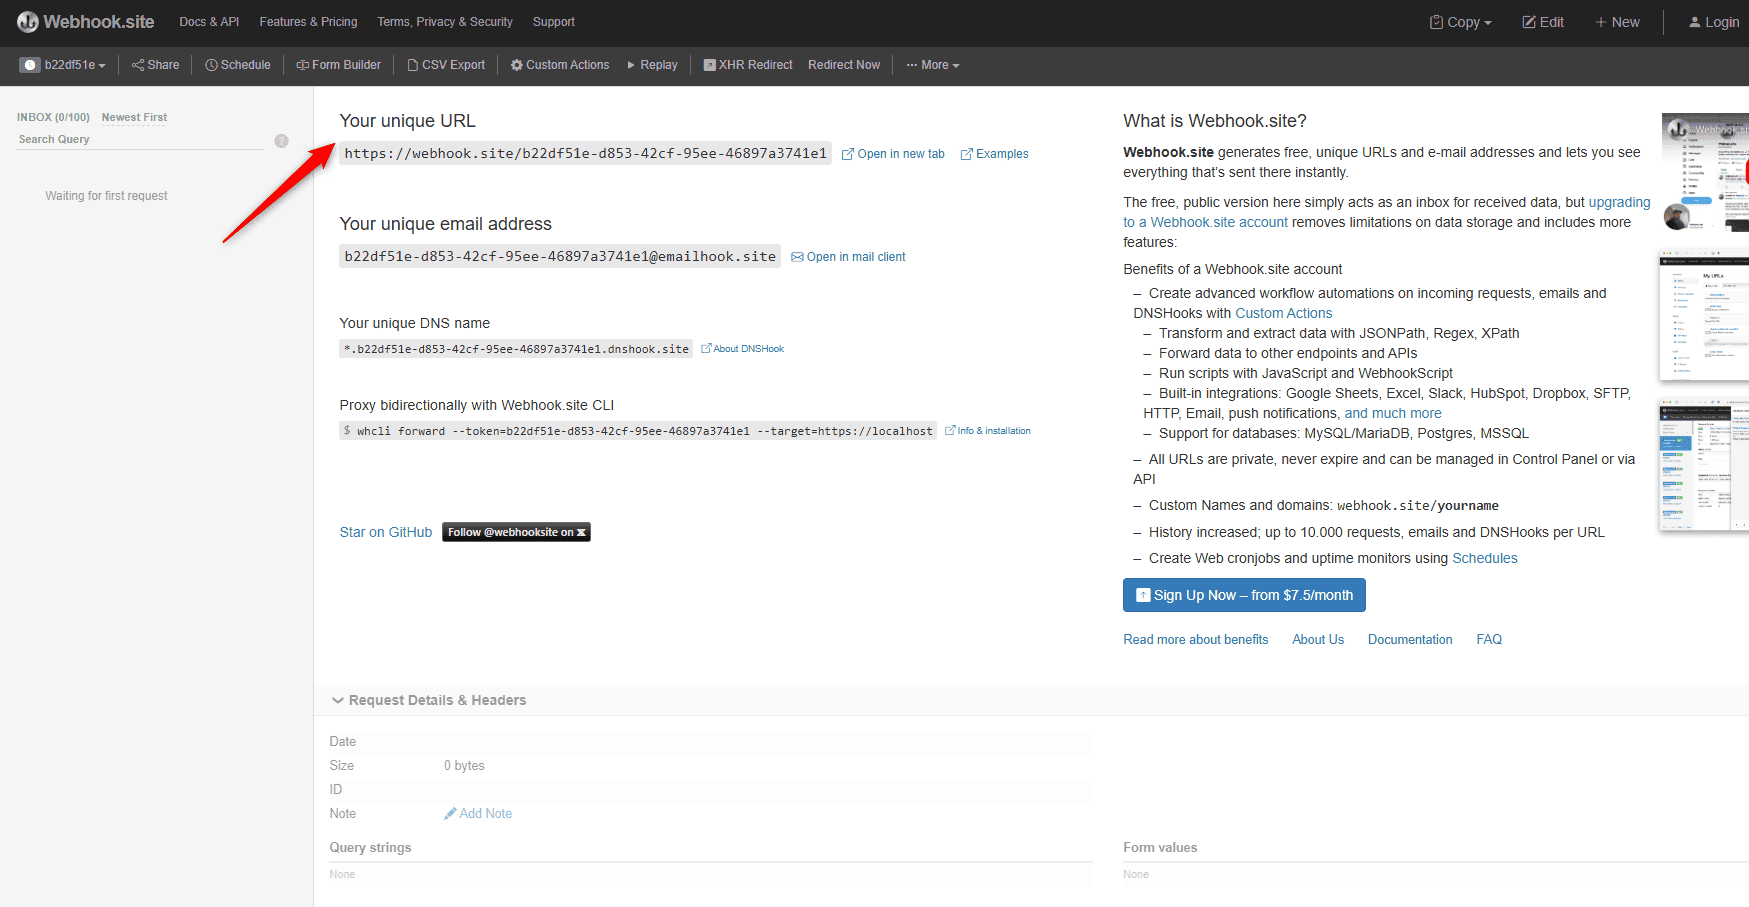
- Open webhook.site in a browser tab. A unique URL is generated for you at the top of the page.
- Copy that URL.
- Leave the tab open. Anything sent to that URL appears in the page live, so you can see exactly what Atarim delivers.
Step 2 — Add the step in Atarim
Point the request at a test endpoint first, so you can see exactly what Atarim sends before a real system receives it.
Instructions:
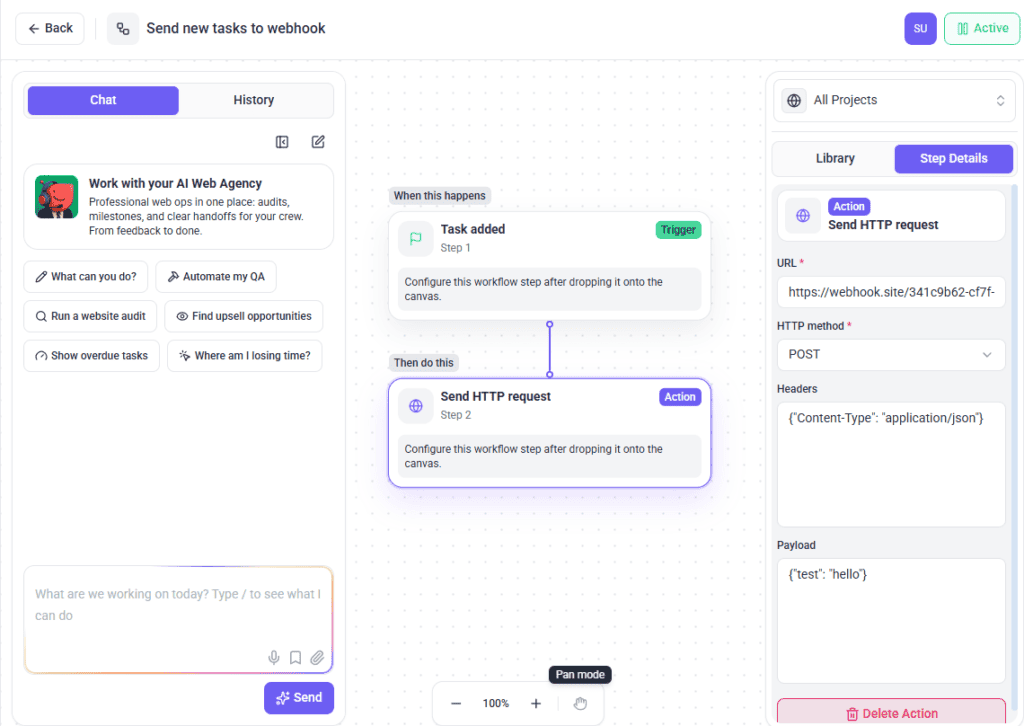
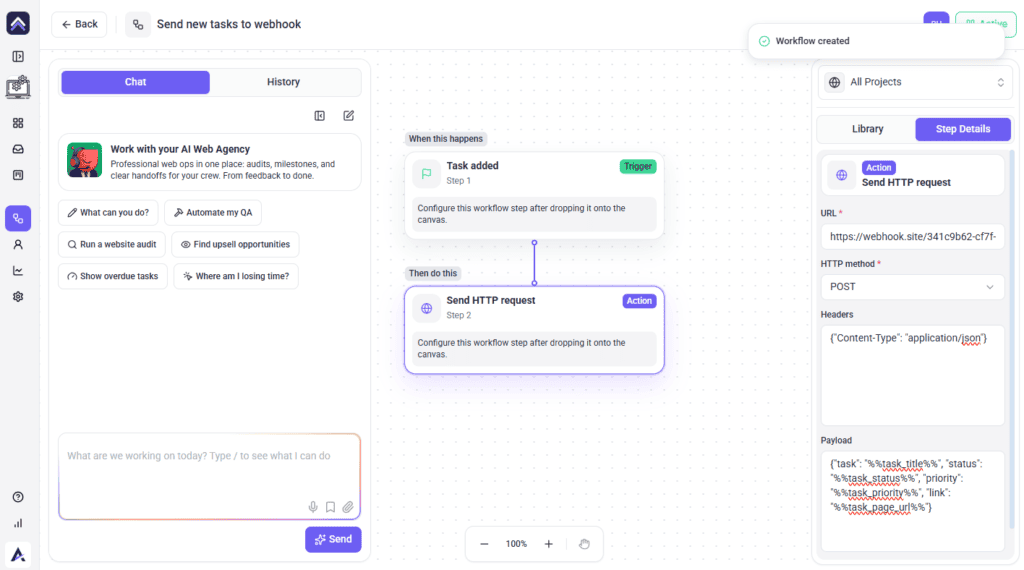
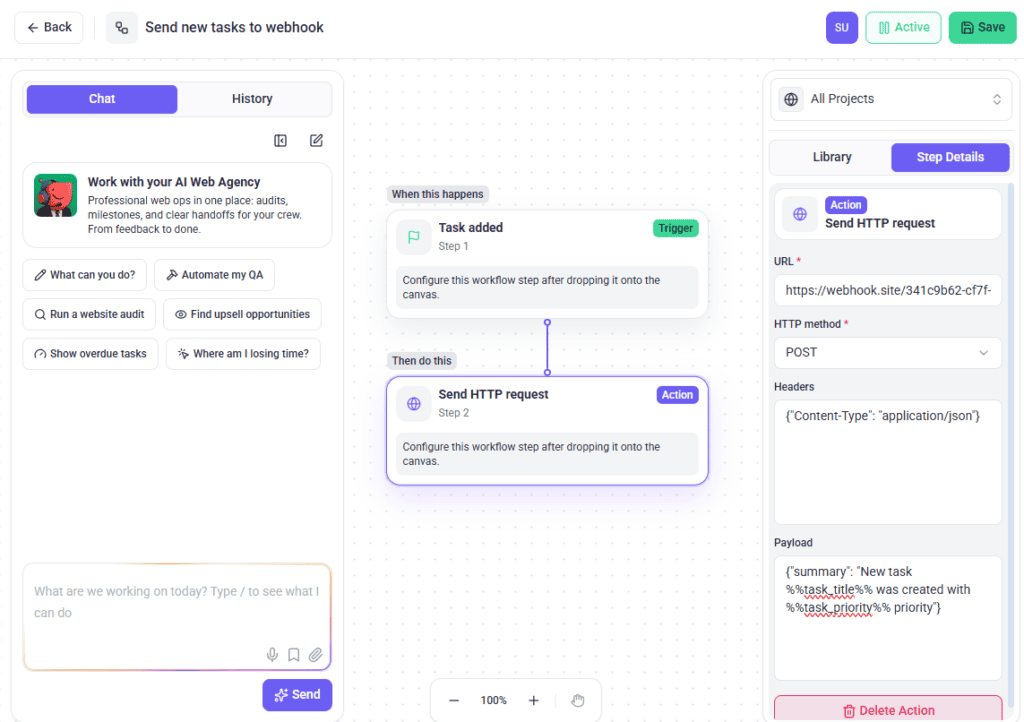
- Go to Workflows, then open an existing workflow or select Create New.
- On the Library tab in the right-hand panel, choose your trigger. For a first test, Task added is the easiest to fire deliberately.
The trigger appears on the canvas as Step 1, under the When this happens label. - Still on the Library tab, add a Send HTTP request step.
It joins the canvas as the next numbered step, under a Then do this label. - Select that step on the canvas to open the Step Details tab.
The panel shows the step’s name with its Action badge, followed by its fields. Required fields are marked with a red asterisk. - Paste your test URL into URL.
- Set HTTP method to POST.
- Leave Headers empty for now — authentication can wait until basic delivery is proven.
- Use the Select projects… selector at the top of the panel to choose which projects the workflow runs against.
- Select Save, then Launch to switch it on.
Step 3 — Write your payload
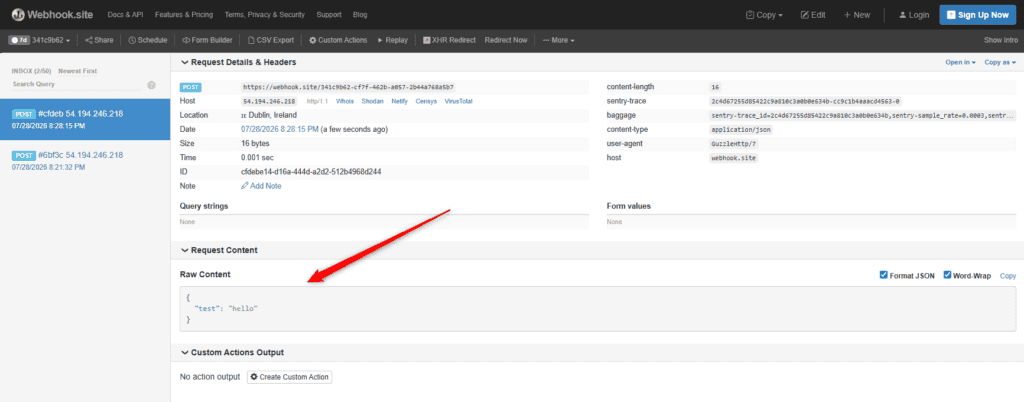
Start with something fixed, confirm it arrives, then add live data.
A static payload sends the same thing every time:
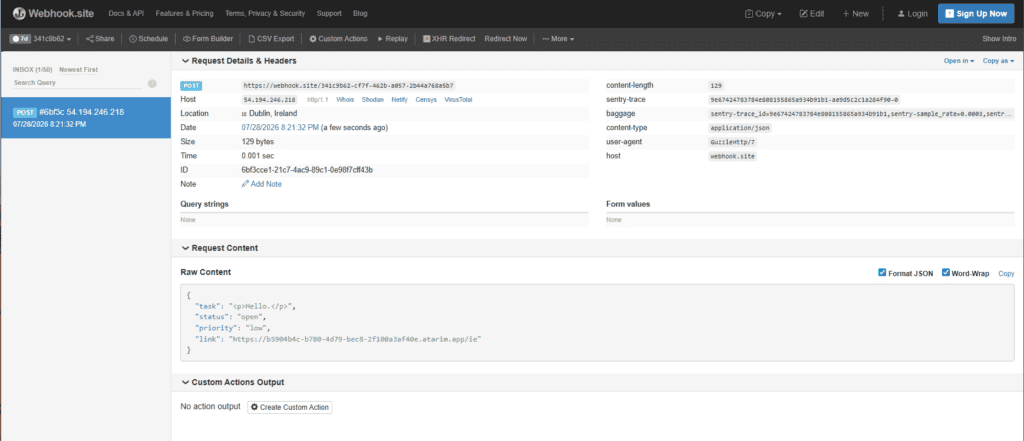
A dynamic payload uses placeholders, which are replaced with real values when the workflow runs:
{"title": "%%task_title%%", "status": "%%task_status%%", "url": "%%task_page_url%%"}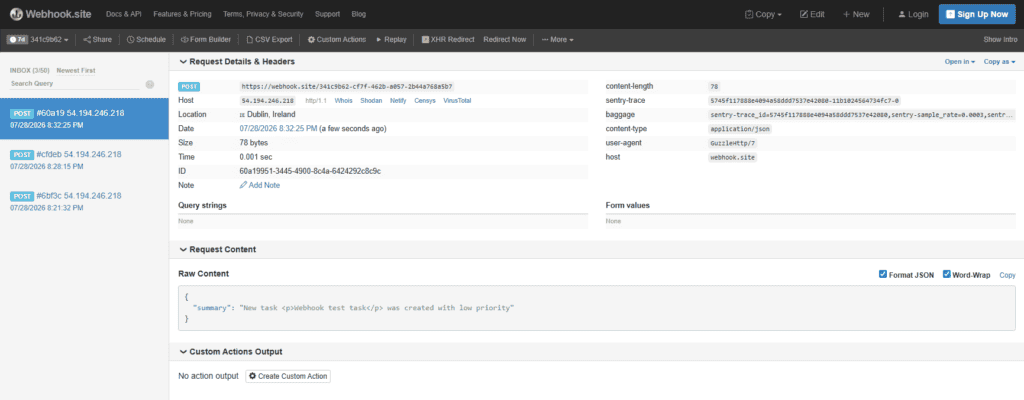
Mixed text and placeholders work too — a placeholder can sit anywhere inside a string:
{"summary": "New task %%task_title%% was created at %%created_at%%"}Step 4 — Test and check what arrived
What matters here is the payload, not the delivery — a request that arrives with empty placeholders has still failed.
Instructions:
- Trigger the workflow — if you used Task added, create a test task.
- Switch to your webhook.site tab. The request appears within a few seconds, showing the headers and the body exactly as Atarim sent them.
- Check every placeholder was replaced with a real value. An empty value means the placeholder name is wrong.
- In Atarim, open the Runs tab and confirm the step reads Executed.
- Adjust the payload and repeat until it looks right.
Step 5 — Switch to your live endpoint
Only swap in the real endpoint once the test payload looks right, because the receiving system will act on whatever arrives.
Instructions:
- Replace the test URL with your real endpoint.
- Add any authentication under Headers. For example:
{"Authorization": "Bearer YOUR_TOKEN", "Content-Type": "application/json"} - Save, and trigger it once more.
- Confirm at the receiving end that the data arrived and was understood. Atarim reports whether it sent the request, not whether the other service accepted it.
A comment payload

The same approach works for comment data. A fuller payload might look like this:
{
    "task_info": "Task ID: %%id%%, Site ID: %%site_id%%, Priority: %%task_priority%%, Status: %%task_status%%",
    "author_details": "Author: %%task_config_author_name%%, Task Title: %%task_title%%",
    "page_info": "Page URL: %%task_page_url%%, Page Title: %%task_page_title%%",
    "comment_details": "Comment ID: %%comment_id%%, Comment Message: %%comment_message%%",
    "task_timing": "Created At: %%created_at%%, Updated At: %%updated_at%%"
}
Placeholder reference
Placeholders are wrapped in double percent signs and replaced when the workflow runs.
| Placeholder | Inserts |
|---|---|
%%task_title%% |
The task’s title. |
%%task_status%% |
Its current status. |
%%task_priority%% |
Its priority. |
%%task_page_url%% |
The URL of the page the task sits on. |
%%task_page_title%% |
The title of that page. |
%%task_config_author_name%% |
Who created the task. |
%%id%% |
The task identifier. |
%%site_id%% |
The project identifier. |
%%created_at%% |
When the task was created. |
%%updated_at%% |
When it was last updated. |
%%comment_message%% |
The text of the most recent comment. |
%%comment_author%% |
Who left that comment. |
%%comment_id%% |
The comment identifier. |
%%task_title%% works; %%title%% on its own does not and will come through empty. If an older guide gave you short names, use the prefixed versions above instead.
What to use it for
Typical uses for the step:
- Sending task summaries to an internal dashboard.
- Logging task events to a database through a serverless function.
- Posting to a custom Slack app that needs its own formatting.
- Kicking off automations in tools such as Make, n8n, or Pipedream.
What workflows cost
Every workflow run costs 10 credits, whether or not it has AI steps, and AI steps add their own cost on top. The cost shown on a template or in the Manage table is an estimate per run: the 10-credit base plus the trigger and the steps.
Usage appears in your credit history labelled Workflow Initiated, so you can see what your automations are consuming alongside everything else.
When a workflow switches itself off
Atarim watches for workflows that keep failing. After three consecutive failed runs, the workflow is deactivated automatically and an email is sent letting you know, with a link to it. Runs stopped because you ran out of credits don’t count toward the three.
The failure count resets as soon as a run succeeds, so occasional failures will not trip it — only a genuine, repeated problem.
The Manage tab also flags a workflow that needs attention with a badge beside its name. Select Failing, Never succeeded or Out of credits to open its latest failed run.
| Badge | What it means |
|---|---|
| Not run yet | The workflow is active but has not run in the last 30 days. |
| Failing | Some of its recent runs failed. Open the latest failed run to see which step broke. |
| Never succeeded | It has failed at least twice in the last 30 days without a single success. Repeated failures switch a workflow off automatically. |
| Out of credits | Its recent runs stopped because the account ran out of credits. The workflow itself is fine, and it runs again once credits are available. |
Known limitations
Where the feature stops:
- A workflow must be attached to at least one project to do anything, unless it is triggered by Incoming Email. It must also be switched on separately.
- A workflow runs only on the projects attached to it, or on every project when set to All Projects.
- Three consecutive failures deactivates a workflow without asking.
- Templates currently target WordPress only as their supported technology.
FAQs
Do workflows cost credits?
Yes. Every run costs 10 credits, plus the cost of any AI steps. The estimate is shown on each template and in the Manage table. Failed runs are charged too.
Why isn’t my workflow running?
Almost always one of three things: it is not switched on, it is not attached to a project, or your credit balance is negative.
Can a workflow run across all my projects?
Yes. Choose All Projects in the project selector, in the builder or on the Manage tab. The workflow then runs on every project, including ones you add later. If you manage clients (Beta), it also covers the projects of clients linked to that workspace.
What happens if a workflow keeps failing?
After three consecutive failures it deactivates itself and emails you. A single successful run resets the counter, and runs stopped for lack of credits don’t count.
Does editing a template change everyone’s workflows?
No. A copy made with Use is yours, and editing it has no effect on the template or on anyone else. A workflow added with Subscribe follows Atarim’s updates to that template until you unsubscribe.
Can one workflow trigger another?
Yes. There are triggers for when a workflow starts, completes, or fails, so automations can be chained or monitored.
Why does a step say Executed rather than Success?
Deliberate wording. Runs are Success or Failed; individual steps are Executed, Skipped, Failed, or Retrying. Executed means the step did its job.
Can I send workflow output to another tool?
Yes. There are steps for Asana, Basecamp, Clickup, Jira, Monday, Teamwork, and Trello, a Slack notification step, plus Send HTTP request for anything else.
Can I Cancel or Reset a Time Delay?
Once a delay has started it runs its course unless the workflow is switched off or conditions change. Delays are based on real-time activity at the point the workflow was triggered.
Common issues
- Workflows is missing from the sidebar. Your role does not include it. Team Members don’t have Workflows by default, and it isn’t set in Settings → Workspace Permissions, so ask an administrator about your role.
- You can see workflows but not create them. Creating needs a separate permission from viewing, and it isn’t set in Settings → Workspace Permissions. Ask an administrator about your role.
- A workflow’s steps cannot be edited. It is a subscribed workflow, so Atarim keeps its steps up to date. Select Unsubscribe from template to make it yours to edit; it then stops receiving updates.
- A workflow never runs. Check three things in order: is it active, is it attached to at least one project, and is your credit balance positive.
- A workflow switched itself off. It failed three times in a row. Check the Runs tab for the failures and read the trace before reactivating.
- Runs stopped without warning. Check your credit balance. A negative balance blocks runs rather than queuing them.
- The Runs count on Manage has not moved. That column counts successful runs only. Check the Runs tab — the workflow may be running and failing.
- Some steps say “Skipped”. A step is skipped when a condition ahead of it was not met, or when the step needs an integration whose provider is not connected — in that case the trace names the reason. Open the trace and check that condition’s configuration, or connect the provider under Settings.
- A step says “Executed” but nothing happened. Most integration steps now check that the push actually landed before reporting Executed, so on those, Executed means the item is in the other tool — look for it there. Jira is not covered by that check yet, so an Executed Jira step is worth confirming in Jira itself. On other kinds of step, open the run trace and check that step’s configuration, particularly any project or field it depends on.
- A step’s dropdown is empty. Many step fields load options from your workspace. Choose the project the step applies to first, then reopen the dropdown.
Conclusion
Workflows pay off on the work nobody enjoys remembering — the monthly check, the update round, the task that should exist the moment a client comments. Start from a template, watch one run end to end before trusting it, and keep an eye on the Runs tab rather than the success count. Automations are only useful while they are actually running.
Tips & best practices
- Start from a template rather than a blank canvas. It is faster, and you learn the building blocks by reading something that already works.
- Name workflows after what they do, not what they use. “Monthly WordPress update round” beats “AI workflow 3” when you have a dozen of them.
- Test against one low-stakes project before attaching client work. The run trace will show you exactly what happened.
- Build a workflow that watches for failed workflows, so you hear about a broken automation the first time it fails rather than the next time you open the Manage tab.
- Check the Runs tab, not the Runs count. The count hides failures entirely.
- Do the credit maths before choosing a daily cadence. Cost per run multiplied by runs per month is the number that matters.
- After any workflow deactivates itself, read the trace before switching it back on — otherwise it will simply fail three more times.