Webhooks
Automate workflows and connect Atarim to tools that don’t have a built-in integration.
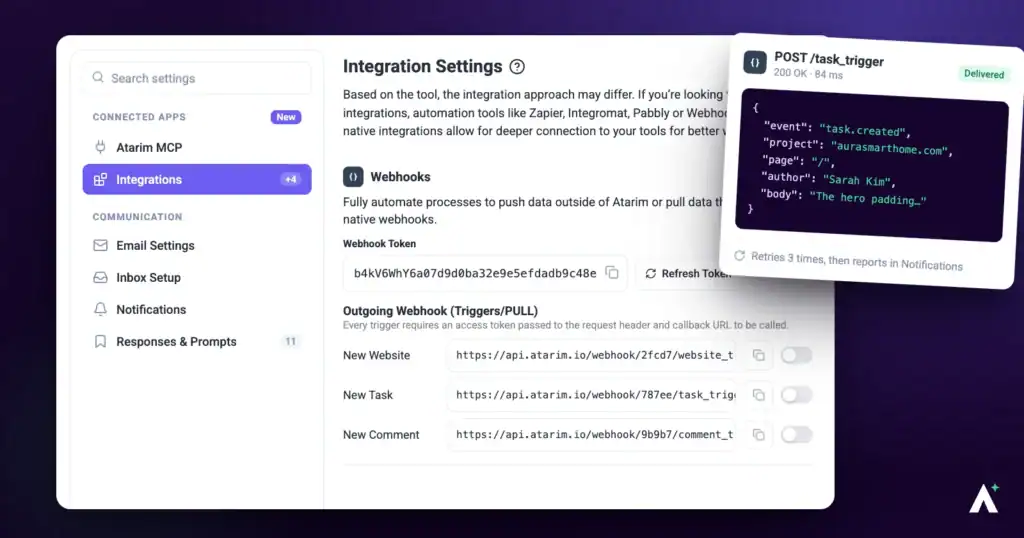
Webhooks let Atarim exchange data in real time with external tools — Zapier, Make, Asana, Basecamp and anything else that speaks the format. They are the general-purpose option when no purpose-built integration exists, and they work in both directions.
You can receive notifications when events happen in Atarim, automate work in other systems, and keep data in sync so teams stay aligned.
What Are Webhooks?
A webhook is a way for two applications to send data to one another automatically. When a specific event happens in Atarim — a task being created, say — a webhook sends an HTTP POST request to a URL you have configured, known as the webhook endpoint.
Because webhooks are a standard format used across the web, developers can write their own code to receive and process the payload. That is what makes it possible to automate processes and sync tools with no direct Atarim integration at all.
Atarim supports them in both directions: outgoing webhooks (pull) fire when an event occurs in Atarim, and incoming webhooks (push) let an external system make something happen inside Atarim. Used together they give you bi-directional automation, so both systems stay in step without anyone copying between them.
Should You Use Webhooks at All?
Usually not. Atarim has built-in integrations for Zapier, Make and Pabbly that handle the connection for you, and they are worth preferring for four reasons.
- A simpler setup process
- Pre-configured triggers and actions
- Compatibility that is tested and maintained
- Better performance and reliability in most cases
Reach for manual webhooks when you need a custom automation, your tool is not supported natively, or you are working in a system you have built yourself.
Where to Find Them
Both directions are configured on the same page — outgoing events in one list, incoming actions in another.
Instructions:
- From the main dashboard, select Settings.
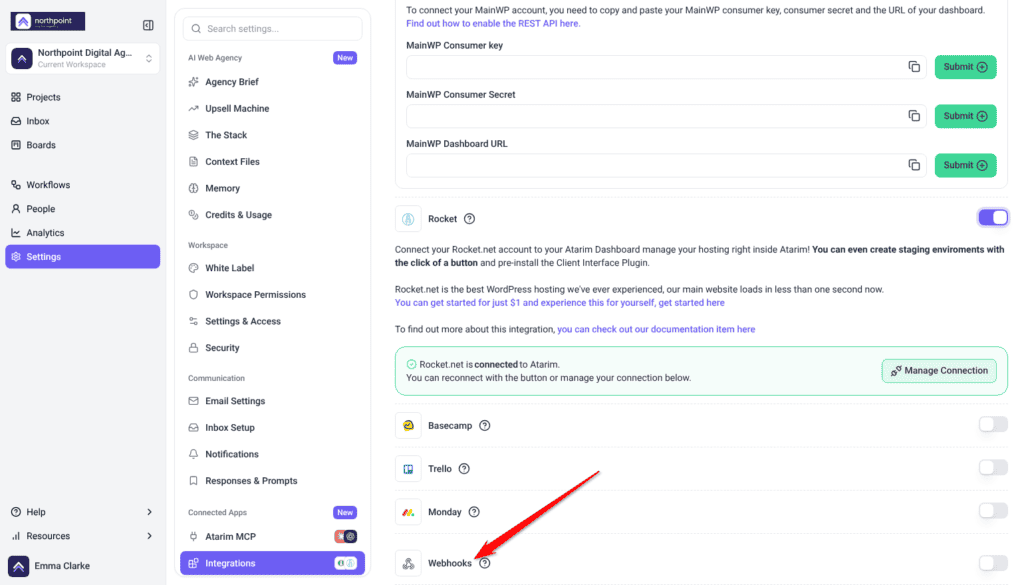
- Under Connected Apps, select Integrations. There is no separate Webhook entry in the sidebar — webhooks live inside the Integrations panel.
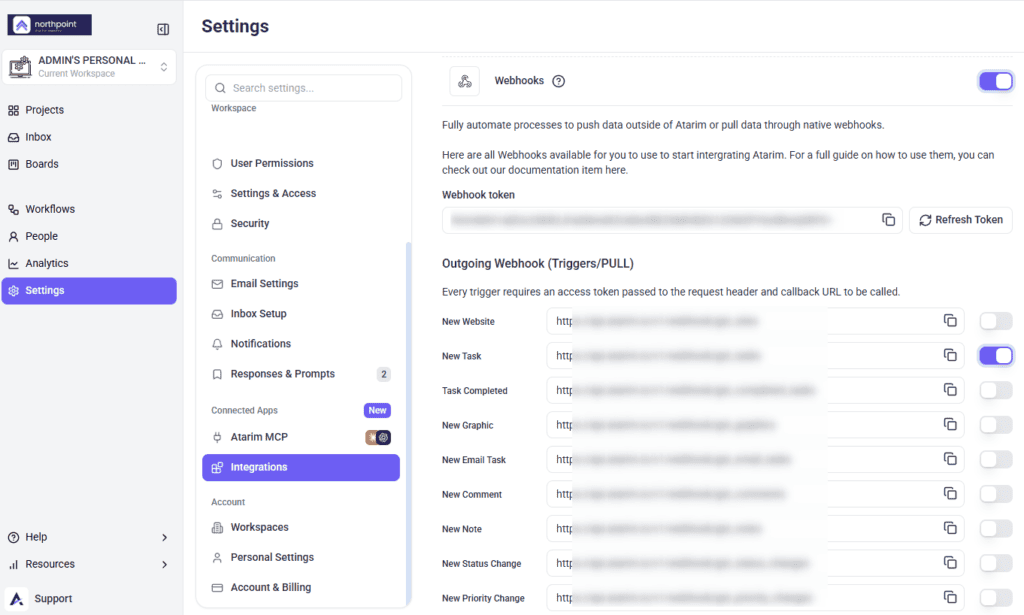
- Find the Webhooks card among the integrations and switch it on. It then shows your Webhook token, Outgoing Webhook (Triggers/PULL), Incoming Webhook (Actions/PUSH) and Custom Webhook.
Outgoing Webhooks: Sending Data Out of Atarim
Also called pull webhooks. These fire when an event happens in Atarim and make its data available to your automation tool. Eleven events are available.
| Event | Fires when |
|---|---|
| New Task | A task is created. |
| Task Completed | A task is marked complete. |
| New Comment | Someone comments on a task. Client-visible comments only — internal notes are excluded. |
| New Status Change | A task’s status changes. |
| New Priority Change | A task’s priority changes. |
| New Assigned User | Someone is assigned to a task. |
| New Tag | A tag is applied. |
| New Email Task | A task arrives by email. |
| New Form Submission | A form submission comes in (only for accounts that already have Forms). |
| New Graphic | A design is added. |
| New Website | A website is added. |
Outgoing means Atarim publishes the event and your automation tool polls for it.
Instructions:
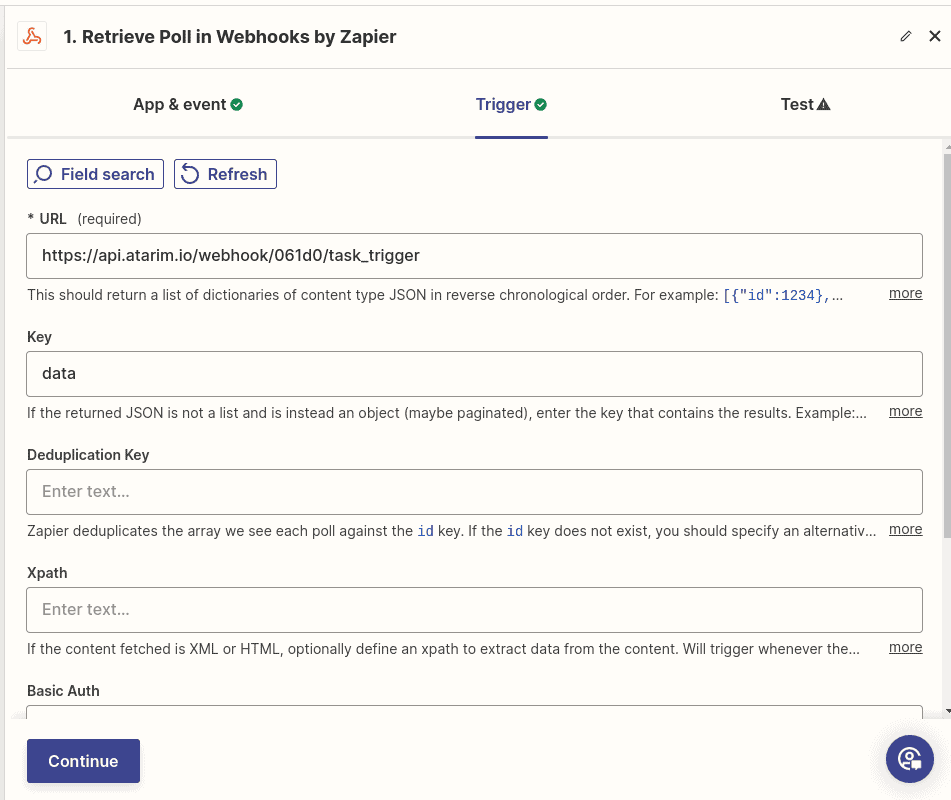
- In Zapier or Make, create a new automation and select Webhooks as the trigger app.
- Choose Retrieve Poll as the trigger type. This periodically checks Atarim for new data, which suits Atarim’s outgoing webhooks.
- In Atarim, open the Webhooks card and find the event under Outgoing Webhook (Triggers/PULL). Each event has its own row showing its name, its URL, a copy control and a switch.
- Switch the event on.
- Select the copy control beside its URL, then paste it into the URL field in your automation tool.
- Add the authentication header described below, then save and test.
Authentication
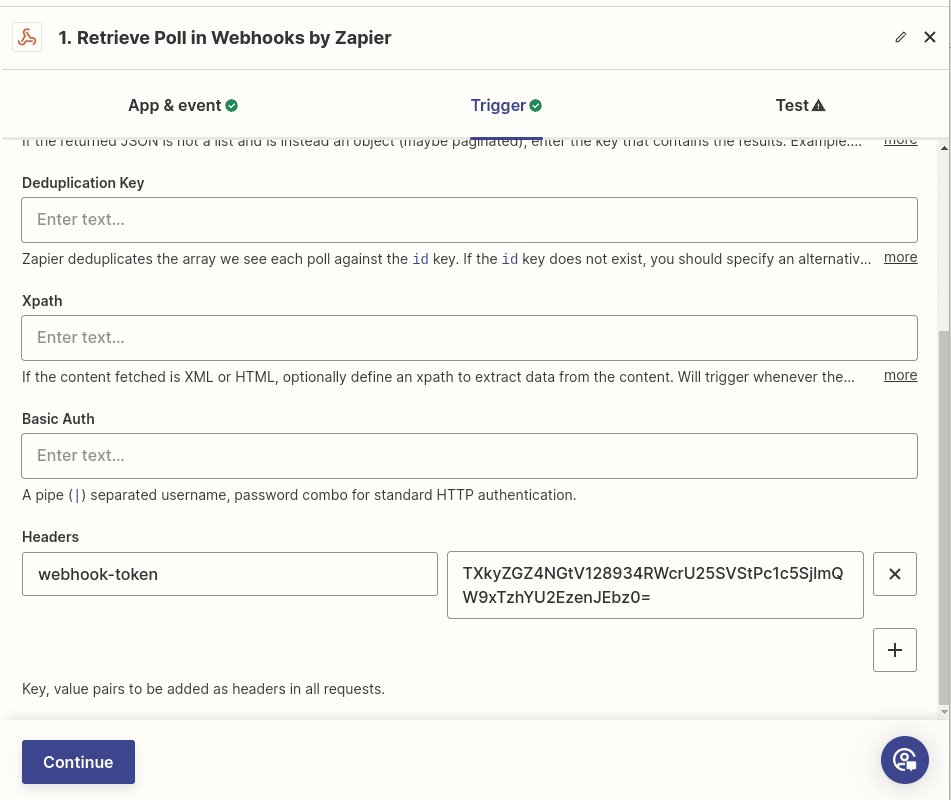
Atarim requires authentication on webhook requests, using an HTTP header. This applies in both directions.
Instructions:
- Find your Webhook token in the Webhooks section of Settings.
- In your automation tool, add a custom header.
- Set the header name to
webhook-tokenand its value to your token. - Save.
Incoming Webhooks: Sending Data Into Atarim
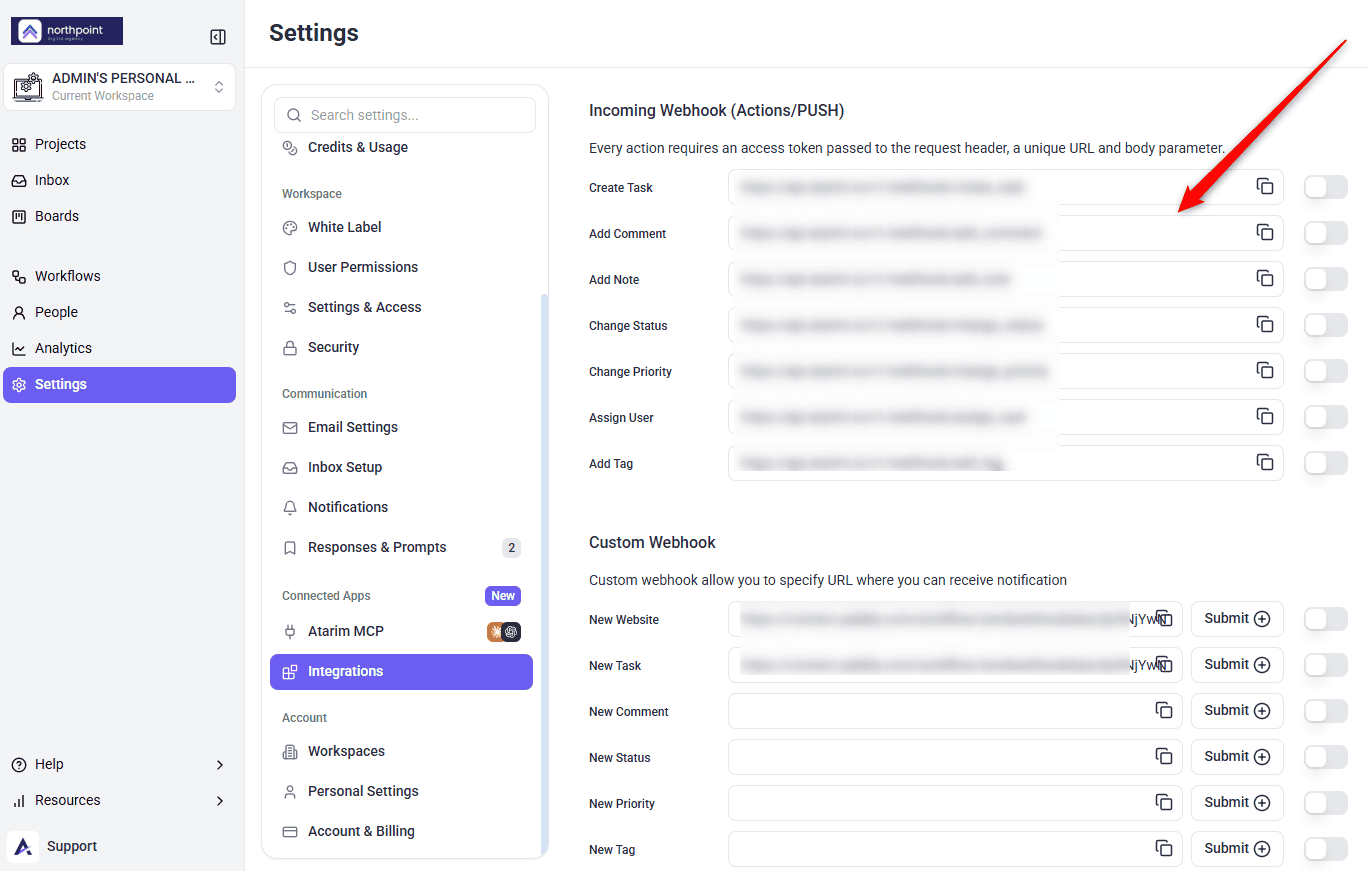
Also called action or push webhooks. These give you a URL that an external system calls with a POST request to make something happen in Atarim. Seven actions are available.
| Action | What it does |
|---|---|
| Create Task | Creates a task in Atarim. |
| Add Comment | Adds a comment to a task. |
| Add Note | Adds an internal note to a task. |
| Add Tag | Applies a tag to a task. |
| Assign User | Assigns someone to a task. |
| Change Status | Changes a task’s status. |
| Change Priority | Changes a task’s priority. |
Incoming runs the other way, with your tool posting to Atarim — and only POST is accepted.
Instructions:
- In your automation tool, create a new action and choose Webhooks as the action app.
- Select POST as the method. POST is required — GET and PUT will not work.
- In Atarim, open the Webhooks card and find the action under Incoming Webhook (Actions/PUSH).
- Switch the action on, then use the copy control beside its URL. Each action has its own URL, laid out the same way as the outgoing rows.
- Paste the URL into the URL field of your action.
- Set the content type and request body as described below.
- Add the
webhook-tokenheader. - Test, then activate.
Choosing the Content Type
Automation tools ask you to set a content type for the request. The values below reflect what has worked reliably for each action; if a request is rejected, switching between JSON and form encoding is worth trying.
| Action | Payload type |
|---|---|
| Create Task | JSON |
| Add Comment | JSON |
| Add Note | Form |
| Add Tag | JSON |
| Assign User | Form |
| Change Status | JSON |
| Change Priority | JSON |
Building the Request Body
Most actions identify the task by its task UUID — the bare uuid value, not a dashboard URL — passed as task_uuid, then carry the value you want to apply.
| Action | Required parameters |
|---|---|
| Create Task | site_uuid or site, page_uuid or page, plus message, users, urgency, status |
| Add Comment | task_uuid, comment_content, complete_task |
| Add Note | task_uuid, comment_content, complete_task |
| Add Tag | task_uuid, value |
| Assign User | task_uuid, users |
| Change Status | task_uuid, value |
| Change Priority | task_uuid, value |


site_uuid or site, and either page_uuid or page — they are alternatives, so you do not need both halves of either pair.
complete_task is required on Add Comment and Add Note, and must be exactly yes or no. Omitting it fails validation even though it might look optional.
Accepted Values
| Parameter | Accepted values |
|---|---|
value for status | open, in-progress, pending-review, complete |
value for priority | low, medium, high, critical |
complete_task | Required on Add Comment and Add Note. Must be exactly yes or no, lowercase. On Add Comment, yes marks the task complete after the comment is posted. |
Zapier Format Settings
If you are building this in Zapier, two settings affect whether Atarim can read your payload.
- Wrap request in array: No
- Unflatten: Yes

Custom Webhook
The Custom Webhook section is where you paste a URL of your own — described in-product as letting you specify a URL where you can receive notifications. It is the route automation platforms use when they generate a webhook URL for you to register.
It offers fourteen event fields. Eleven line up with the outgoing list, though three are labelled differently here: New Status, New Priority and New Assign User rather than New Status Change, New Priority Change and New Assigned User. Three have no outgoing equivalent at all: Comment Updated, Comment Deleted and Task Updated.
Instructions:
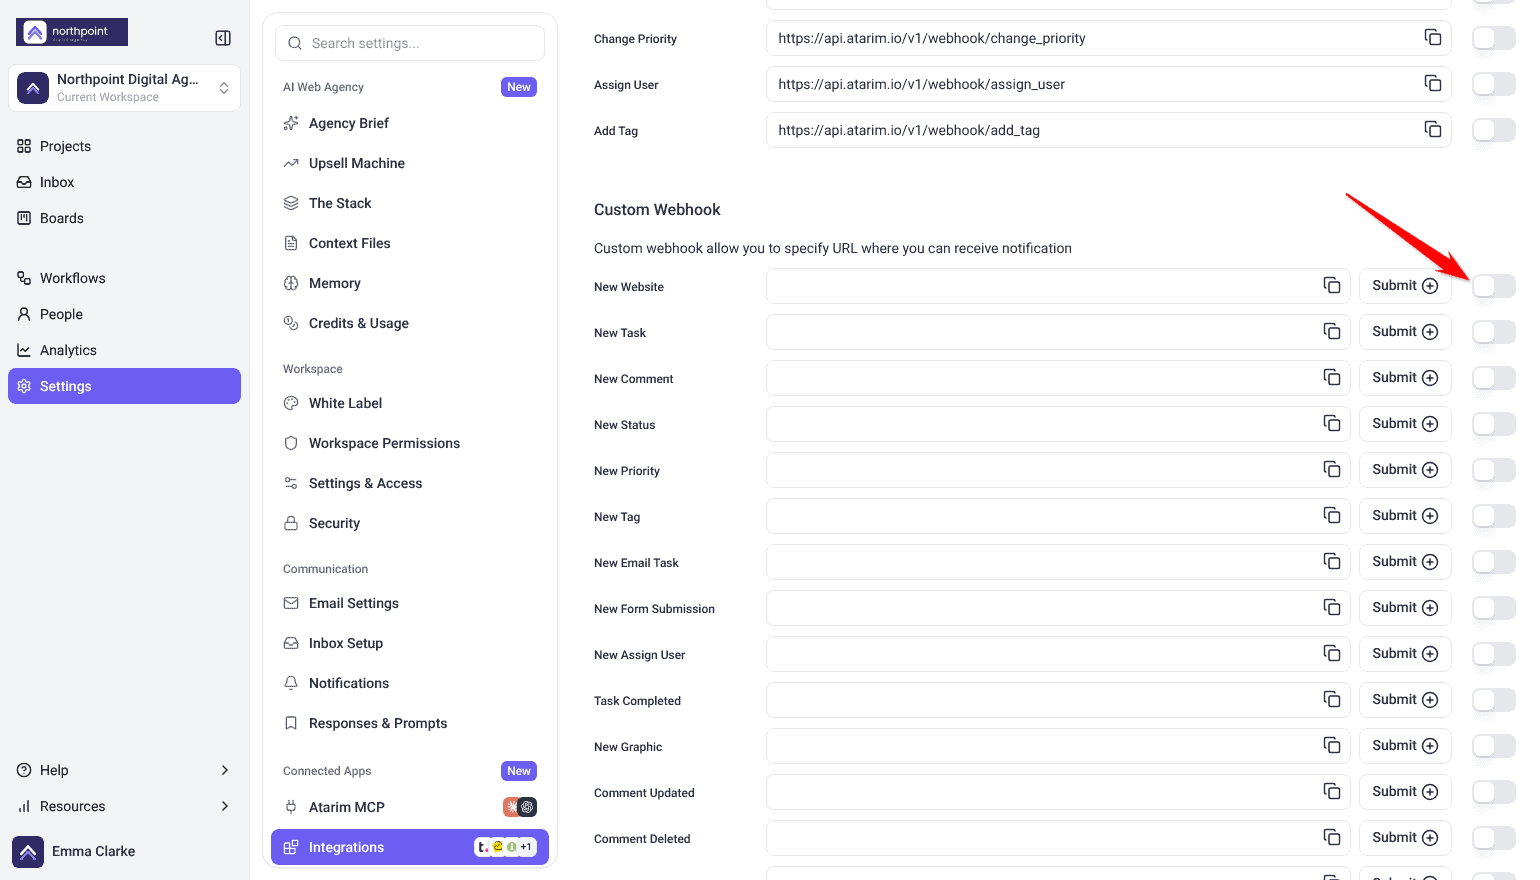
- Find Custom Webhook in the Webhooks section.
- Paste your URL into the field for the event you want. It has to start with
https://— anything else is rejected as Wrong URL format. - Switch that row’s toggle on. This is the step that is easy to miss: a saved URL with the toggle off never fires, and nothing warns you.
- Select Submit beside the field to save the URL. Atarim posts that event’s data to your URL from then on, and a copy control lets you retrieve the value later.
FAQs
Where do I find my webhook token?
In the Webhooks section of Settings, shown as Webhook token.
Do I need webhooks if I use Zapier, Make or Pabbly?
Often not — those integrations handle the connection. Some setups still ask you to register a webhook URL in Atarim, so the two work together rather than being alternatives.
Can I test before going live?
Yes. Use your automation tool’s test function, or send a sample payload manually and check the result in Atarim.
How does Atarim know which task to act on?
Through task_uuid in the request body — the bare uuid value, not a dashboard URL. Every action except Create Task requires it.
Why is my request rejected?
Usually a missing required parameter or a value outside the accepted list. Check task_uuid is present, and that status and priority values are lowercase and hyphenated.
Can one webhook trigger several actions?
Not directly — each action has its own URL. Multi-step automations in Zapier or Make can chain them.
Do I need to write code?
No. Zapier, Make and Pabbly cover most cases without any.
Will an outgoing webhook send internal notes?
No. The outgoing New Comment trigger returns client-visible comments only, because it filters on the note flag, and there is no outgoing New Note event to enable in the first place. Add Note exists only as an incoming action. The one exception is the Custom Webhook section: its own New Comment field fires on every new comment, notes included.
Common issues
- Your tool reports an unauthenticated error — check the
webhook-tokenheader is present and matches the current token. - Requests are rejected — check the required parameters are all present.
task_uuidis needed by every action except Create Task, andcomplete_taskis required on comments and notes. - A status or priority change does nothing — the value must match exactly, lowercase and hyphenated, such as
in-progress. - The Webhooks section is locked — your plan does not include integrations. The lock names the minimum plan.
- Data arrives for the wrong event — the URL is in the wrong Custom Webhook field. Each event has its own.
- Internal notes reached an external tool — the Custom Webhook New Comment field sends notes too. Point it at a team-only destination, or remove its URL.
- Zapier sends but Atarim ignores it — check Wrap request in array is No and Unflatten is Yes.
- Some events work and others do not — only events with a URL saved and their switch on will fire. Check each one you expect.
Conclusion
Webhooks cover what the built-in integrations do not: outgoing for telling other systems what happened, incoming for letting them act on Atarim.
Three things account for most failures — a missing webhook-token header, the wrong payload type, and a value that does not match the accepted list. Check those first and most problems resolve quickly.
Tips & best practices
- Use the built-in Zapier, Make or Pabbly integrations before building webhooks by hand.
- Always add the
webhook-tokenheader — without it, Atarim refuses the request. - Include
task_uuidon every action except Create Task. - Use the exact status and priority values, lowercase and hyphenated.
- Enable one event at a time and confirm it works before adding more.
- Validate payloads with your tool’s built-in tester, or with something like Postman if you are working outside an automation platform.
- Filter in your automation tool so only relevant events trigger actions.
- Enable error logging so failed events are visible rather than silent.
- Think twice before using the Custom Webhook New Comment field, which includes internal notes.