Adding and Managing Folders in Atarim
Group projects by client or by theme, control who can reach them, and keep a growing Projects screen navigable.
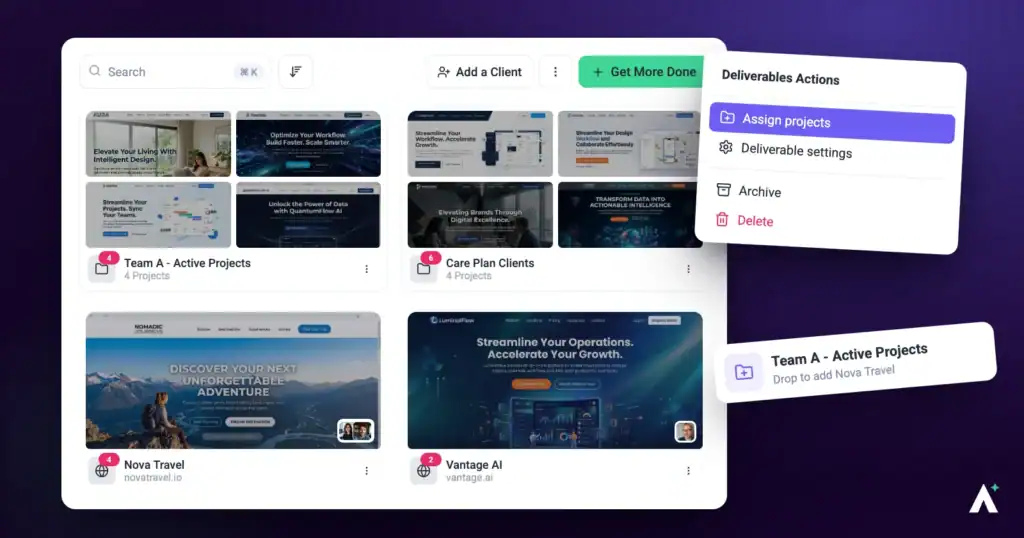
Folders group related projects on your Projects screen. Past about ten projects they stop being a nicety and start being the difference between finding a site in two seconds and scrolling for it.
They do more than tidy, though. A folder can carry its own team members, so access travels with the grouping — and a folder can represent a client (Beta), with the client attached to it.
Two Kinds of Folder
Worth knowing before you start, because they are created differently and the second gets extra controls.
| Kind | Created with | What it adds |
|---|---|---|
| A folder | Add Folder in the ⋮ menu, or Add new › Create a folder. | Groups projects and can carry assigned team members. |
| A client (Beta) | Add a Client at the top of the Projects screen. | The same grouping, plus a client attached to it — with their own invitation, and controls to revoke or disconnect them. |
Creating a Folder
The full form lets you set everything up at once — name, projects, and people — rather than creating an empty folder and filling it afterwards.
Instructions:
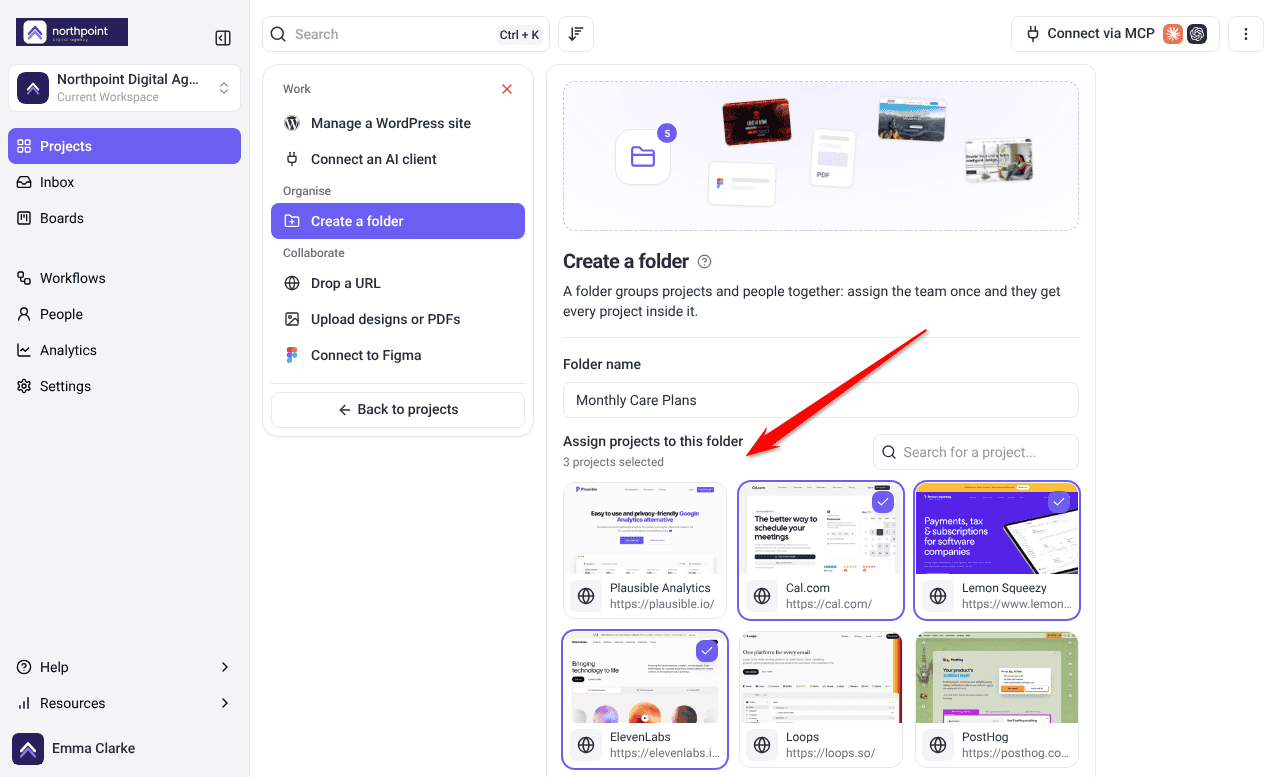
- On the Projects screen, open the ⋮ menu at the top right and select Add Folder. You can also select Add new and choose Create a folder. The Create a folder panel opens.
- Enter a Folder name. It is required, so the panel will not create the folder without one.
- Under Assign projects to this folder, search for and select the projects to file into it.
- Under Assign team members, type a name and press Enter to add each person.
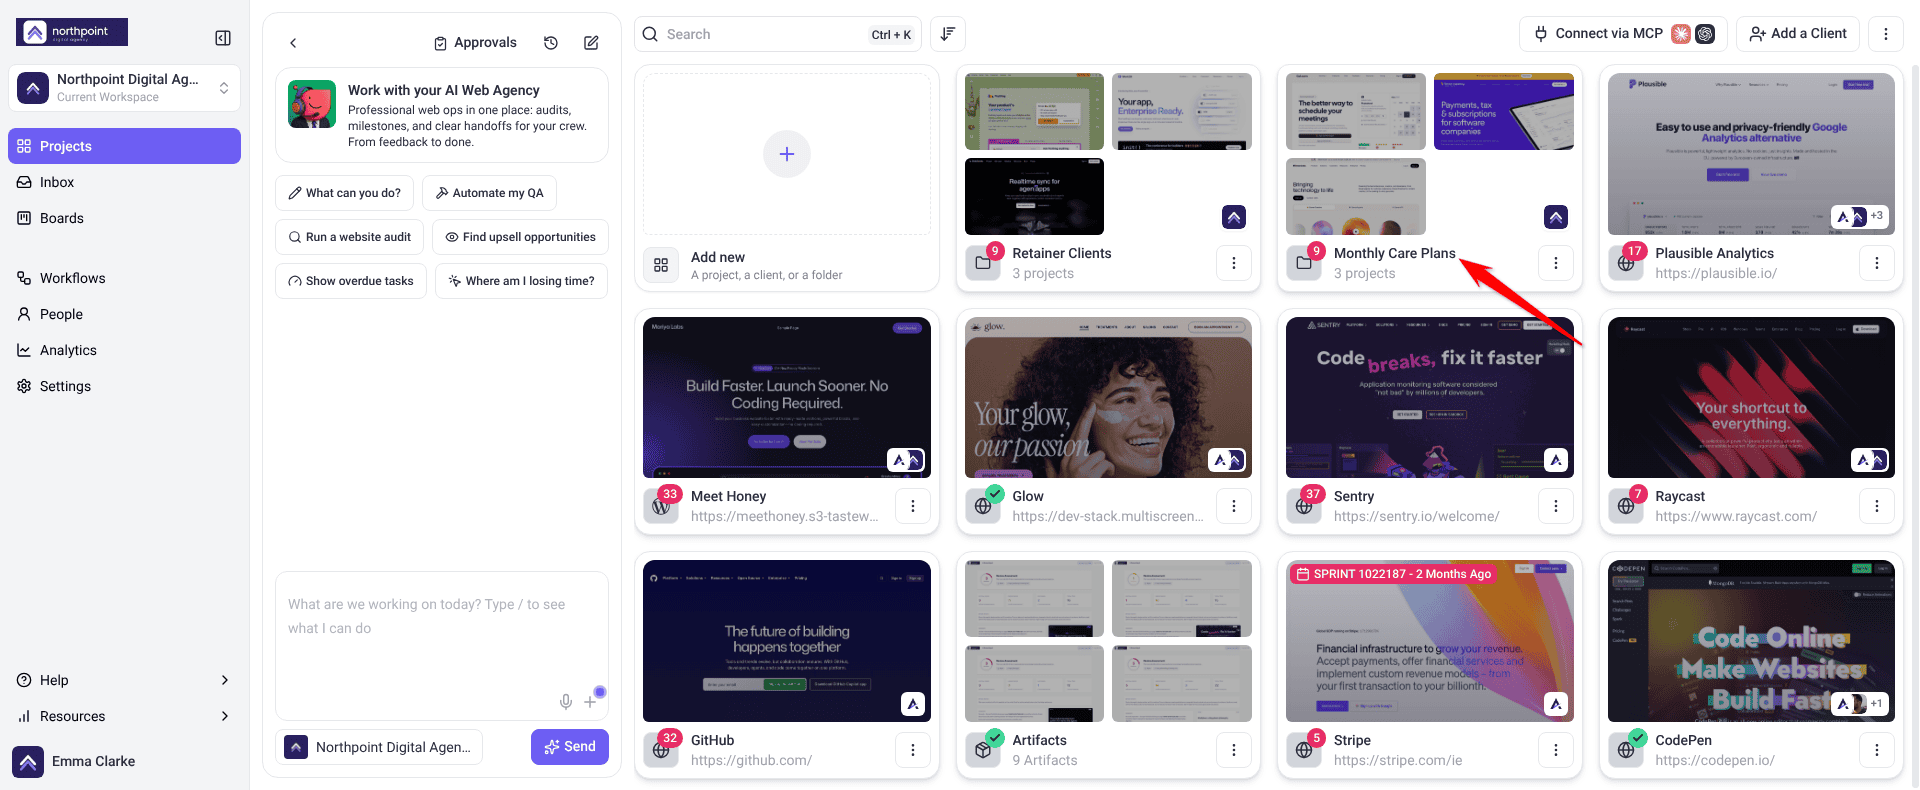
- Select Create folder. A confirmation reads Folder created., and the folder appears on the Projects screen with its projects inside.
Creating a Folder by Dragging
A shortcut worth knowing, and one nobody finds on their own. It is the quickest route when two projects obviously belong together.
Instructions:
- Drag one project card on top of another. A Create a Folder preview shows both projects.
- Drop it. The Create a New Folder form opens with both projects selected, a suggested name, and you as a team member.
- Change the Folder Name if you want to, add anyone else under Assign Team Members, then select Create Folder.
- Drag further projects onto the folder to add them.

Filing Projects into a Folder
Projects can be moved into a folder at any time. Drag the project’s card onto the folder; an Add to folder preview confirms where it is going. You can also open the card’s ⋮ menu, select Change Project Settings and choose the folder under Add this project to a folder, or add the project from the folder’s Folder Settings. The project moves into the folder and leaves the ungrouped list.
Opening and Renaming a Folder
Selecting a folder opens it as a full screen of its own rather than a small modal, so there is room for its projects and its settings together.
Instructions:
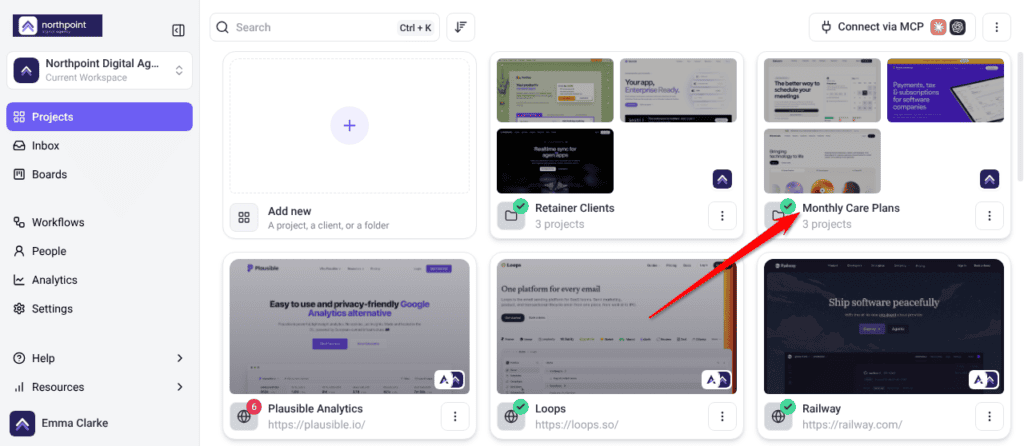
- Select the folder on the Projects screen. It opens as its own view, with a breadcrumb back to All Projects.
- To rename it, select the folder name and edit it in place. Editing controls appear — Save edit to apply, or Cancel edit to discard. Pressing Escape also cancels.
- Save. A confirmation reads Folder name updated successfully.

Assigning People to a Folder
This is the part of folders that saves the most time, and it is easy to miss because it looks like a tidying feature. Assigning someone to a folder gives them access to every project inside it — so one action replaces adding them to each project in turn.
Instructions:
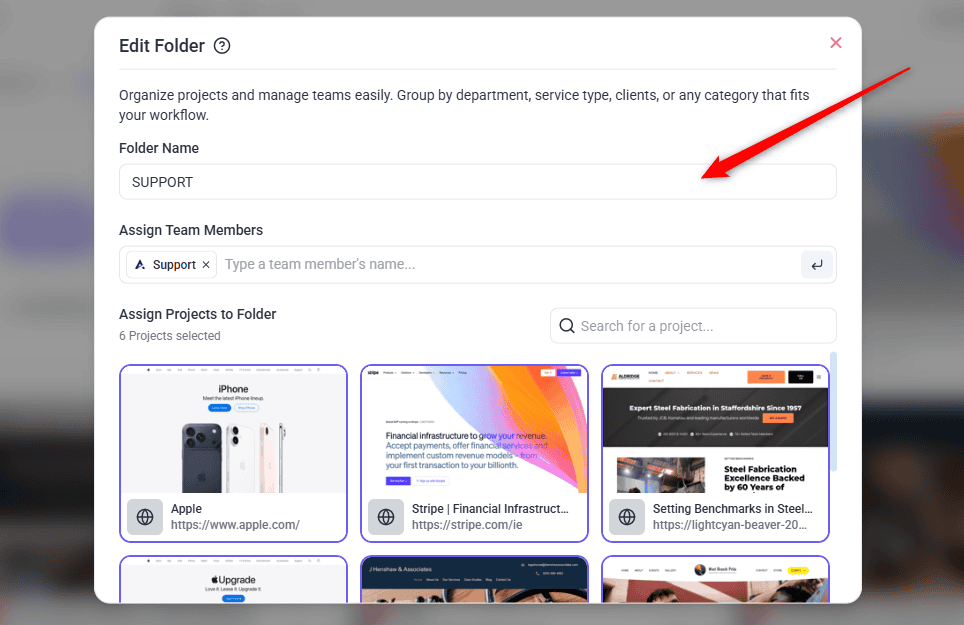
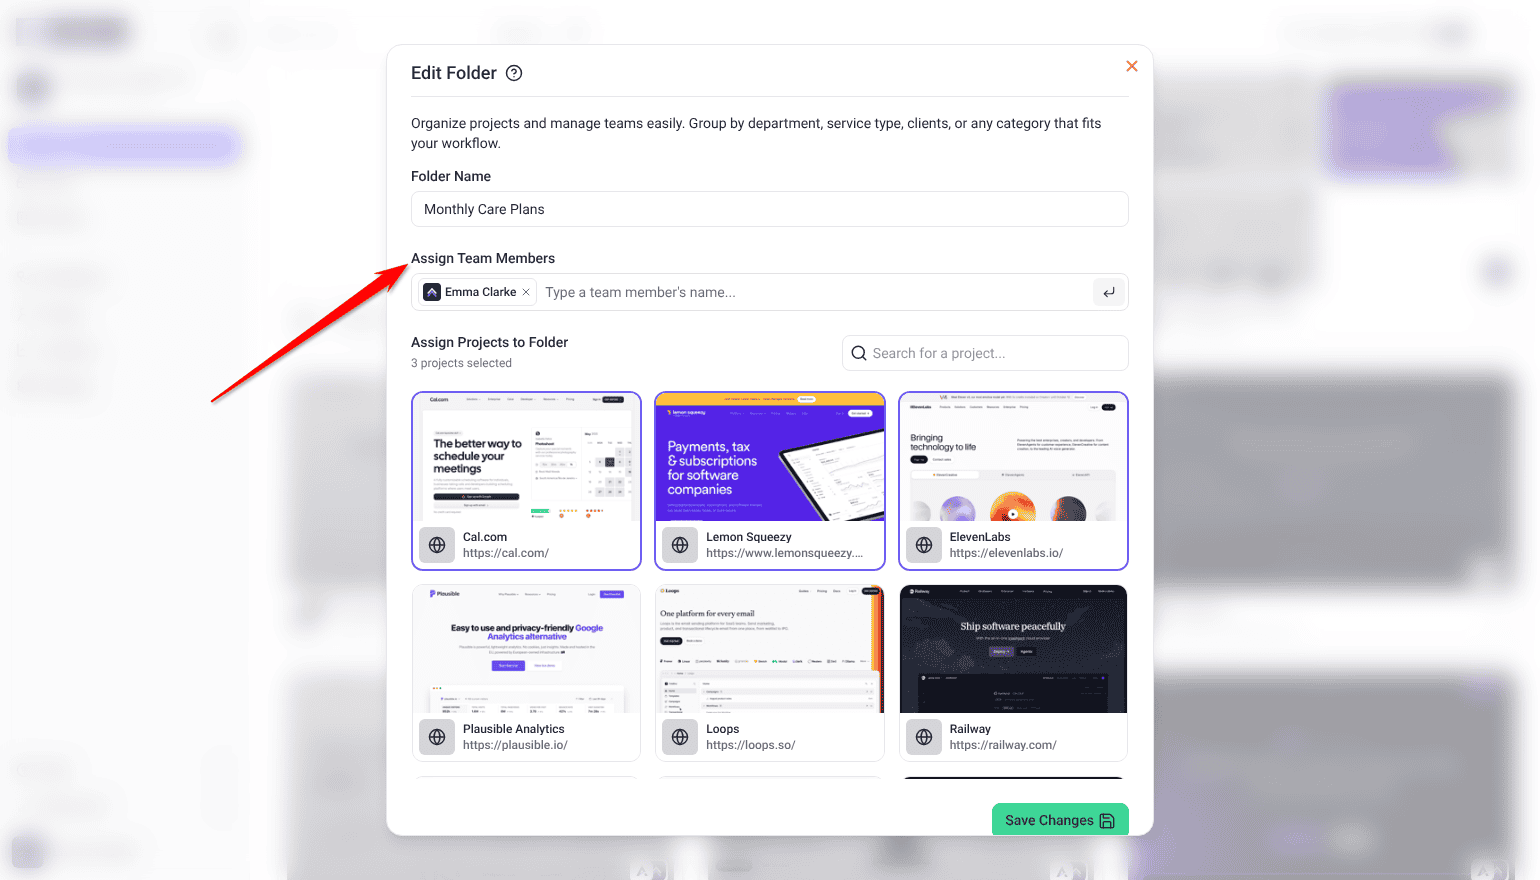
- Open the folder’s ⋮ menu and select Folder Settings. An edit dialog opens.
- Find Assign Team Members. Anyone already assigned is listed there.
- Type a name and press Enter to add them. You can add several one after another without leaving the field.
- Repeat for everyone who should have access, then select Save Changes. A confirmation reads Folder updated successfully, and each person now has access to every project in the folder.
New Projects Are Covered Automatically
The real benefit shows up later. Because access follows the folder rather than the project, a project filed into the folder afterwards is already covered — add it as normal, drag it into the folder, and everyone assigned can already reach it.
| Assigning per project | Assigning to the folder | |
|---|---|---|
| Adding one person to a client with 11 projects | 11 actions | 1 action |
| A new project for that client | Assign everyone again | Covered automatically |
| Someone leaves the account | Remove from each project | Remove once |
| Best for | One-off involvement in a single project | Teams working on a whole account |
Client Folders
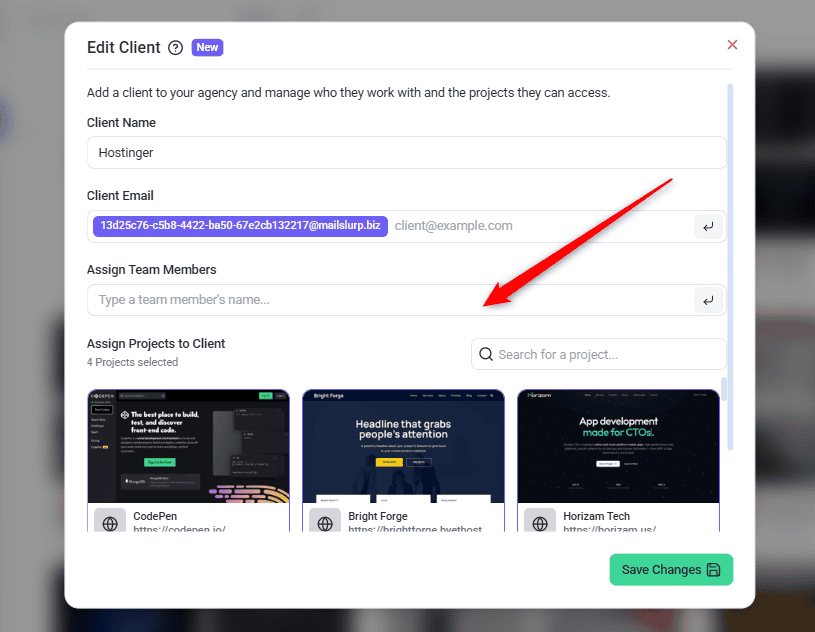
Creating a client gives you a folder with the client attached, which is why Add a Client sits at the top of the Projects screen. It opens the Add a client panel in Add new.
Instructions:
- On the Projects screen, select Add a Client.
- Enter the client’s Brand name and Client email. A client takes one email address.
- Leave Notify the client ticked to email them an invitation now, or untick it to invite them later.
- Set the Client budget, the credits their work can spend.
- Under Assign projects to this client, choose their projects.
- Select Add client. A confirmation reads Client invited., and the client appears on your Projects screen as their own folder.
Managing the Client on a Client Folder
A client folder’s ⋮ menu has its own actions, and they change once the client accepts.
| Action | What it does |
|---|---|
| Client Settings | Changes the client’s name and projects. |
| Copy Link | Copies the invitation link to your clipboard while the invitation is pending. Useful when the emailed invitation has not landed. Inside the folder it is called Copy Invite Link. |
| Revoke Client | Cancels an invitation that has not been accepted. |
| Set Budget | Changes how many credits the client’s work can spend, once they have accepted. |
| Disconnect Client | Removes a client who has already accepted. Owners and Administrators only. |
The client details panel
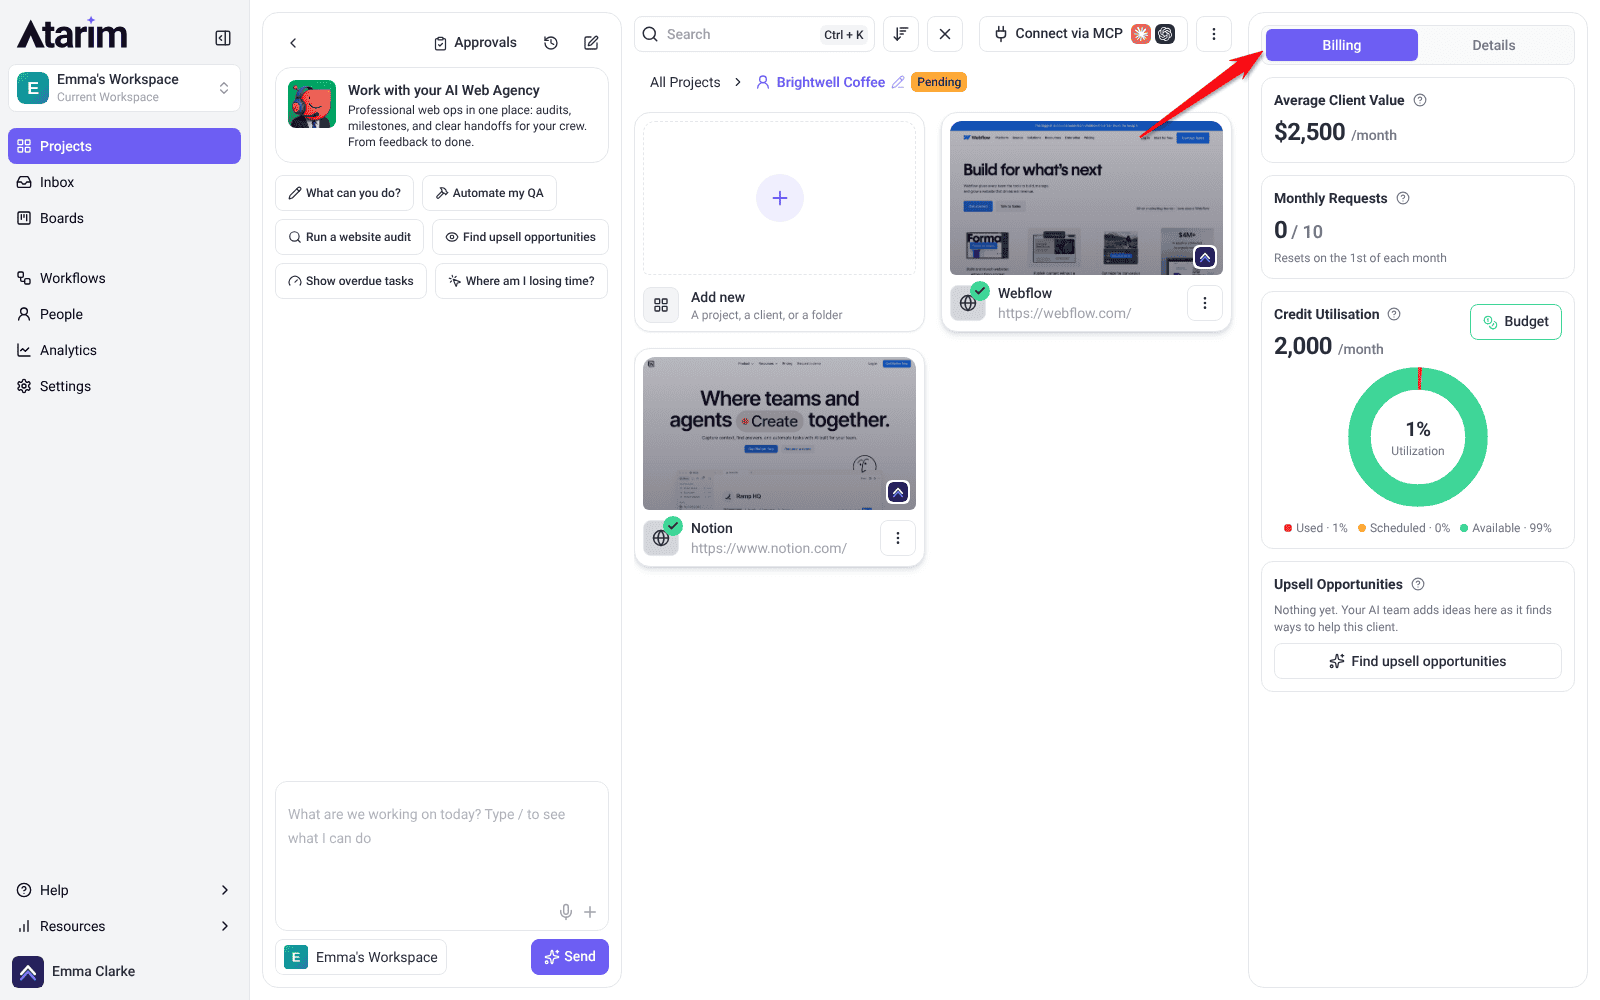
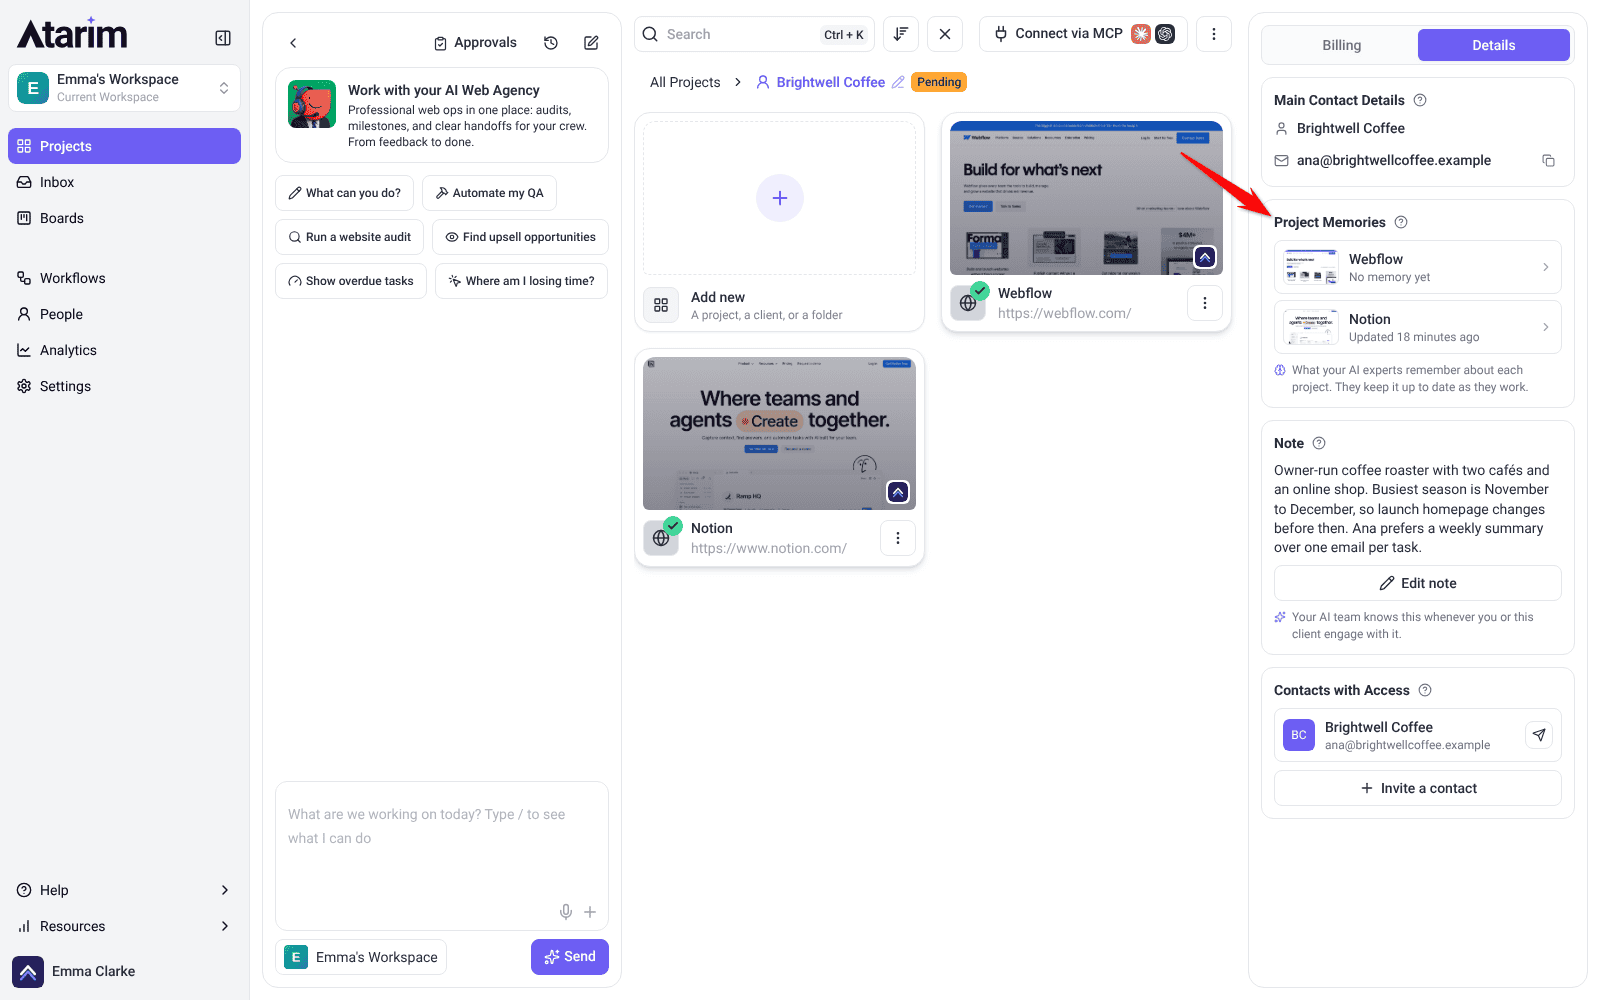
Open a client folder on a computer and a panel on the right holds what you know about that client, in two tabs: Billing and Details. Owners and Administrators see it and can change it.
Instructions:
- On the Projects screen, select the client folder. The panel opens on the right.
- Select Billing or Details.
- To change a figure or the contact’s name, select it, edit it and press Enter. Escape cancels.
The Billing tab
| Card | What it is for |
|---|---|
| Average Client Value | What the client is worth to you, in your currency, per month or one-off. Select Set a value to add it. Your AI team uses it to keep work within budget. |
| Monthly Requests | Tasks the client created themselves this month, out of the number you allow. Select the figure to set a limit or tick Unlimited, and choose the day it resets. Going over does not block the client. |
| Credit Utilisation | This month’s budget, split into used, scheduled and available. Budget opens the window where you set the client’s monthly budget. |
| Upsell Opportunities | Extra work your AI team spotted that could help this client, listed as tasks. Select one to open it. Find upsell opportunities starts a workspace chat (Beta) that asks Claro to look across the client’s projects. Nothing is sent to the client without your okay. |
The Details tab
| Card | What it is for |
|---|---|
| Main Contact Details | The person you work with on the client side. While their invitation is pending you can change the email, and the invitation is sent again to the new address. |
| Project Memories | One row per project in the folder, with when its memory was last updated. Select a row to open that project’s memory. Learn What A Project Memory Holds |
| Note | A private note for you and your AI team. Clients never see it. Select Add a note, write it and select Save. |
| Contacts with Access | People on the client side who can view and comment on this client’s projects, with Resend invite and Remove access beside each one. When nobody has access, Invite a contact asks for a First name and Email, then Send invite. |
On a tablet or phone
On a smaller screen the folder shows a simpler Client details panel instead. It shows whether the client is Connected or the Invitation pending, the credits used this month and the requests this period. You can set the Contract value, Currency, Billing cadence (Monthly or One-off), Request allowance or Unlimited, Reset day of month and Client notes. Select Save details after a change. While the invitation is pending, Resend invitation sends it again.
Deleting a Folder
Folders cannot be archived on their own — there is no Archive action in a folder’s menu. To retire a client without losing their work, delete the folder with Archive projects with folder ticked: the projects are archived and can be restored from Archived Projects, but the folder itself is removed.
Deleting does not automatically remove what is inside the folder, but the dialog offers to — so read it before confirming.
Instructions:
- Open the folder’s ⋮ menu and select Delete Folder. A confirmation appears with two checkboxes beneath it.
- Decide what happens to the projects inside. Leave both unticked and the projects return to your main Projects view. Tick one to archive or delete them along with the folder.
- Confirm.

Benefits of Using Folders
| Benefit | In practice |
|---|---|
| A readable Projects screen | Twenty projects become six folders, and finding a site stops being a scroll. |
| Access travels with the grouping | Assigning someone to a folder grants access to every project in it — and to anything filed into it later. |
| Clients have a home | A client folder (Beta) keeps their projects and their invitation in one place. |
| Onboarding is quicker | A new team member is added to a folder, not to eleven separate projects. |
| Structure survives growth | New work goes into an existing folder rather than onto the end of a list. |
Example Use Cases
| Situation | How to set it up |
|---|---|
| An agency with several clients | One client per client folder (Beta), holding all of their projects. |
| A client with staging and live sites | One folder holding both, so the pair stays together and never gets confused. |
| Separating design work from websites | A folder for design projects, though the Image-Based Projects filter may do the job without one. |
| A team working on one account only | Assign them to that folder rather than to each project, so new work is covered automatically. |
| Two projects that clearly belong together | Drag one onto the other, then name the folder in the form that opens. |
Known Limitations
- A client folder (Beta) takes one email address. Additional client contacts are invited to the projects instead.
- Folders live in one workspace and cannot span several.
- Deleting a folder can delete its projects if the option is ticked, and that cannot be undone.
- Only Owners and Administrators can create or delete folders.
FAQs
What is the difference between a folder and a client?
Both group projects. A client folder (Beta) also has a client attached, with their own invitation and controls to revoke or disconnect them.
Can I assign team members to a folder?
Yes, as you create it or from its settings afterwards.
Does assigning someone to a folder give them access to its projects?
Yes — to every project in the folder, and to any project filed into it later. It is the quickest way to give a team access to a whole client account.
How do I add several people at once?
In Assign Team Members, type a name and press Enter, then the next. They are all applied when you save.
Does deleting a folder delete its projects?
Not by default — they return to your main Projects view. The dialog offers checkboxes to archive or delete them too, so check before confirming.
Can a project be in more than one folder?
A project sits in one folder at a time. To move it, choose a different folder under Add this project to a folder in its project settings.
Is there a quicker way to create a folder?
Yes. Drag one project card onto another. The Create a New Folder form opens with both projects already added.
Can I add more than one client email to a client folder?
No, one only. Additional contacts should be invited to the projects themselves.
Can I archive a folder?
No. There is no Archive action on a folder. You can delete the folder with Archive projects with folder ticked, which archives the projects inside so they can be restored from Archived Projects — but the folder itself is removed.
Common issues
- “Please enter a folder name” or “This field is required.” — the name is required. Enter one before confirming.
- “Failed to create folder” — try again. If it persists, check you have permission to manage projects in this workspace.
- “Folder not found” — it may have been deleted, or your role may not give you access to it.
- A project is missing after you deleted a folder — check whether the delete or archive checkbox was ticked. Archived projects can be restored; deleted ones cannot.
- “You can only add one client email” — a client folder (Beta) takes a single email. Invite other contacts to the projects instead.
- The client was created but has no projects — assignment did not complete. Open their client settings and assign the projects there.
- A folder shows as Empty Folder — nothing has been filed into it yet. Drag a project card onto it, or add projects from its Folder Settings.
- Your rename did not save — editing needs Save edit. Escape or Cancel edit discards it.
Conclusion
Folders are the difference between a Projects screen you scan and one you scroll. Organise by client, assign people to the folder rather than to each project, and create clients as clients (Beta) so their invitation lives somewhere sensible — then new work slots into a structure that already exists.
Folders sit on the Projects screen alongside search, filters, and sorting. Explore The Projects Screen Overview
Tips & best practices
- Organise by client, not by status. Statuses change; clients do not.
- Set folders up once you pass about ten projects — earlier than that they add more than they save.
- Create clients as clients (Beta) rather than plain folders, so the invitation has a home.
- Assign team members to the folder so new projects in it are covered automatically — one action instead of one per project.
- Create the folder at the start of a client relationship, so every project added later inherits the right access.
- Read the checkboxes before deleting a folder — they decide whether its projects survive.